adiba's Profile

2281
Points

Questions
100

Answers
128

  • Asked on September 15, 2021 in Website.

    The amount web designers charge varies wildly.

    Some might charge as low as $5 flat on sites like Fiverr, and some can go up to $100 per hour on other freelancing sites.

    But, most designers charge in the $25 – $50 per hour range.

    Good Luck!

    • 231 views
    • 1 answers
    • 0 votes
  • Asked on September 14, 2021 in Logo Design.

    We can design any kind of Logo. Please visit our website.

    Get inspired by beautiful designs from Design Gallery:
    https://www.5dollargraphics.com/design-gallery/

    Our Reviews:
    https://www.5dollargraphics.com/author/platinumdesignteam/

    All completed projects:
    https://www.5dollargraphics.com/completed-projects/

    Our Facebook Page:
    https://www.facebook.com/5dollargraphics

    • 239 views
    • 1 answers
    • 0 votes
  • Asked on September 12, 2021 in Computer.

    Here’s how to make your laptop faster:

    1. Close system tray programs

    If your computer is off to a slow start, then it’s possible you have too many programs starting up at the same time as Windows itself. Items in the system tray often launch at startup and then stay running while you use your computer.

    To access these items, click the upwards arrow toward the right side of your taskbar.

    A desktop with the system tray open.

    If there are any programs you don’t need to have running, right-click them and close.

    2. Stop programs running on startup

    Similar to programs running in the tray, other programs that automatically run on startup can slow down your computer. Some you may actually want to run, such as antivirus software, but others may be unnecessary.

    Right-click the taskbar and select Task Manager or hit Ctrl-Shift-Escape to launch. Head to the Startup tab and you’ll be able to view each item that runs on startup, along with its impact.

    The Task Manager screen.

    Go through these and decide which ones don’t need to start automatically. This process is especially beneficial to performance if you can disable some of the high impact ones. But note that some of these programs are vital for Windows to operate. For example, the ones with Microsoft listed as the publisher are probably best left alone. If you aren’t sure, either leave it, or try a Google search to find out more.

    To disable, simply right-click and hit Disable. Remember, you’re not disabling the program, just the fact that it runs on startup.

    Windows 7: Instead of accessing Task Manager, you’ll need to search for System Configuration.

    3. Update Windows, drivers, and apps

    You’ve probably heard that keeping your software up to date is a good idea for security. This is true and it can help performance too. Windows will automatically send you a notification when an update is available. You just need to make sure you don’t keep putting it off.

    If you think you might have missed an update, you can always check. Go to Start and click Settings or the settings icon. Then go to Updates & Security Windows Updates.

    A Windows Update screen.

    Aside from your Windows operating system, drivers and apps should be kept up to date too. Again, this is good for both security and performance. If you think you might have missed an update, a quick online search should tell you which version you should be using.

    4. Delete unnecessary files

    Just like our closets and drawers, our computers get cluttered. While you can’t really see it, you know it’s there, and it could be having a negative impact on your computer’s performance. This is especially true if you deal with a lot of large files, such as high-resolution images, audio files, and videos, on a day-to-day basis.

    Free up space by making a habit of deleting files and folders each week and emptying the recycle bin afterwards. Doing this regularly means it’s more likely you’ll remember exactly what’s in the files and folders and won’t be so concerned about mistakenly deleting something important.

    Handy tip: HDDs usually run at peak speed until they reach roughly 90 percent capacity. So if you check how much space is used up and you’re over 90 percent, that’s probably what’s slowing things down. SSDs slow down more gradually as they fill up, so it’s good to stay on top of things. It’s recommended not to fill an SSD to more than 75 percent of its capacity.

    5. Find programs that eat up resources

    If you find that your computer is suddenly running significantly slower, chances are there is a particular program to blame. One way to identify the culprit is to go into your task manager and find out what’s eating up your resources.

    Right-click the taskbar and select Task Manager. Click More details to find out information about the programs that are currently running on your computer. It should show you the Processes tab by default.

    The Processes tab within the Task Manager screen.

    You can click each header to sort the list according to which applications are using the most of that particular resource. If you need to close something, try closing the actual application first. If it won’t close, come back to the Task Manager screen, right-click the application, and hit End task.

    Windows 7: Instead of accessing Task Manager, you’ll need to search for System Configuration.

    6. Adjust your power options

    Windows comes with several preset ‘power plans’ to suit your needs. The default is set to Balanced, which takes into account performance and energy consumption. But the latter is only really a concern if you’re running off battery or trying to keep the electricity bills down. As such, you may want to change your plan.

    As its name suggests, the High performance plan is a better option is your PC is running slow. Although this option uses more energy, it favors performance so should help speed up your machine.

    Aside from the standard options, you could choose to create your own custom plan. Go to Control Panel > Hardware and Sound > Power Options > Create a power plan. Choose which existing plan you would like to start with, enter a name for your new plan, and select Next.
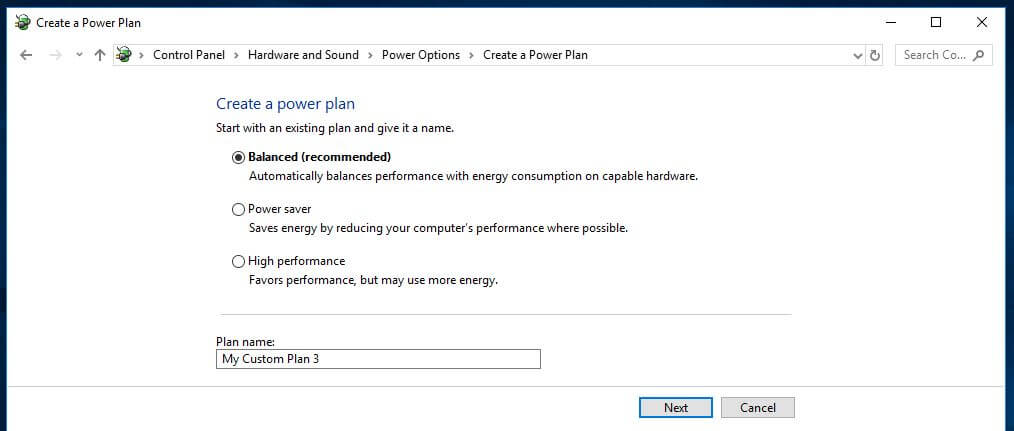
    Power plan options.

    Basic options include how long the display stays on for when you’re inactive and how long before the computer goes into sleep mode. These won’t really affect your computer’s speed, but if you go into Change advanced power settings, you can make more adjustments that will have an impact.

    7. Uninstall programs you don’t use

    We often install huge programs without realizing how much space they’re taking up. If you think that might be the case, you can easily uninstall any programs you don’t use. Even if it’s a program you do use now and again, if it’s particularly large, it might be worth simply reinstalling each time you need it.

    To uninstall a program, head over to Control Panel > Programs > Programs and Features.
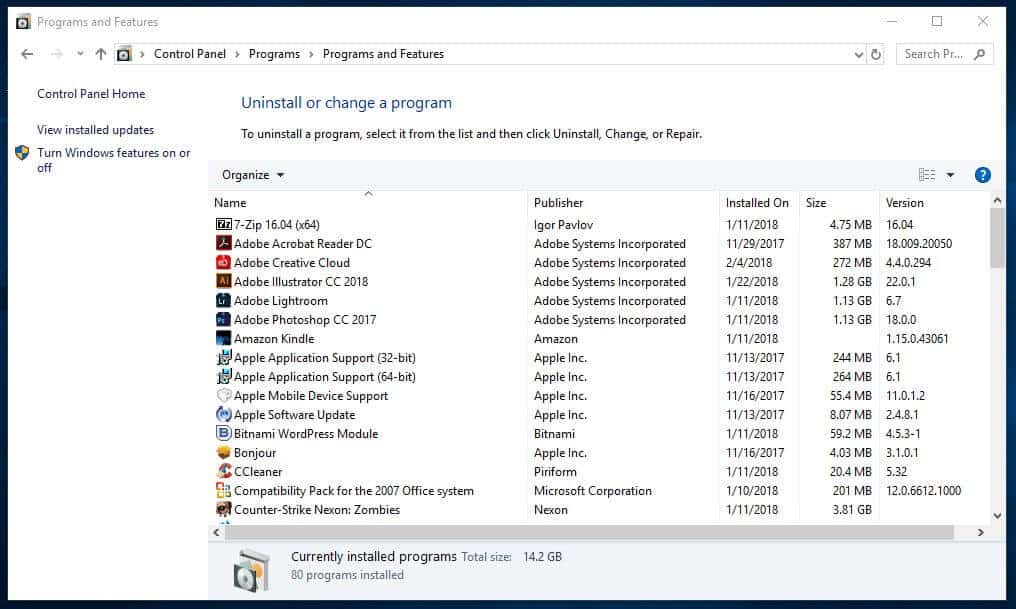
    The Programs and Features screen.

    Go though the programs and decide which ones, if any, you don’t need. If you’re unsure about a particular program, you could simply use a search engine to find out more. Alternatively, you can also use a tool like the aptly named PC Decrapifier to help you distinguish the good from the bad.

    8. Turn Windows features on or off

    While you’re in the Programs and Features screen, you might want to check to see if there are any Windows components you don’t need. Click Turn Windows features on or off and you’ll see a list of these components.
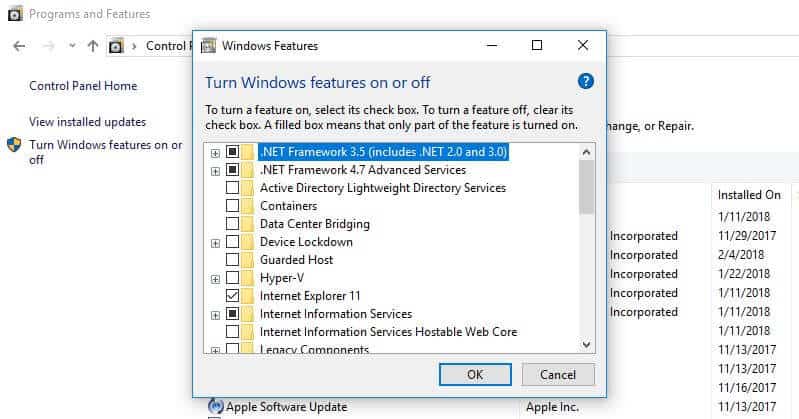
    A Windows Features screen.

    You’ll want to be careful you don’t turn off anything you actually need. So again, a search for anything you’re unsure about is a good idea.

    9. Run a disk cleanup

    Windows comes with a built-in tool for cleaning up junk that accumulates over time. To access the Disk Cleanup tool, go to Control Panel > System and Security > Administrative Tools, and select Disk Cleanup from the list.
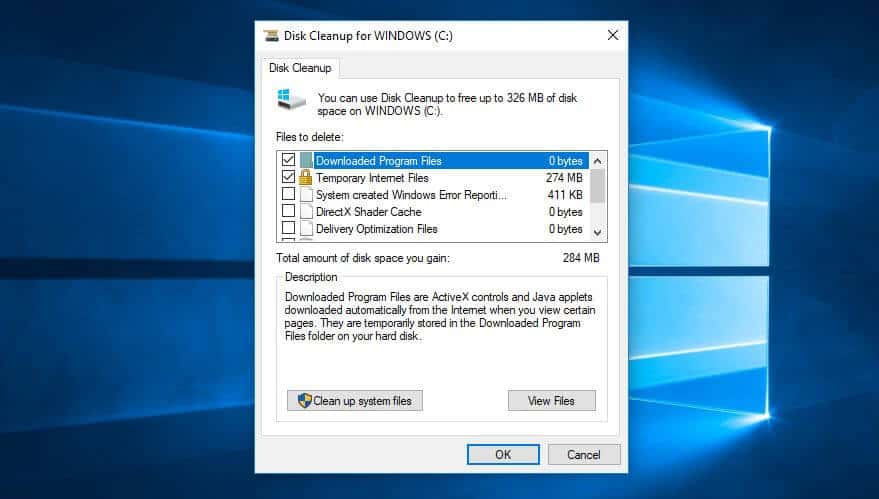
    The Disk Cleanup options.

    Here, you can select the types of files you want to get rid of and click OK. Then click Clean up system files and choose any system files you want to remove.

    If you’d rather not do this manually, there is software you can purchase to help. For example, Iolo System Mechanic will detect and remove junk files in real time so you don’t have to worry about it.
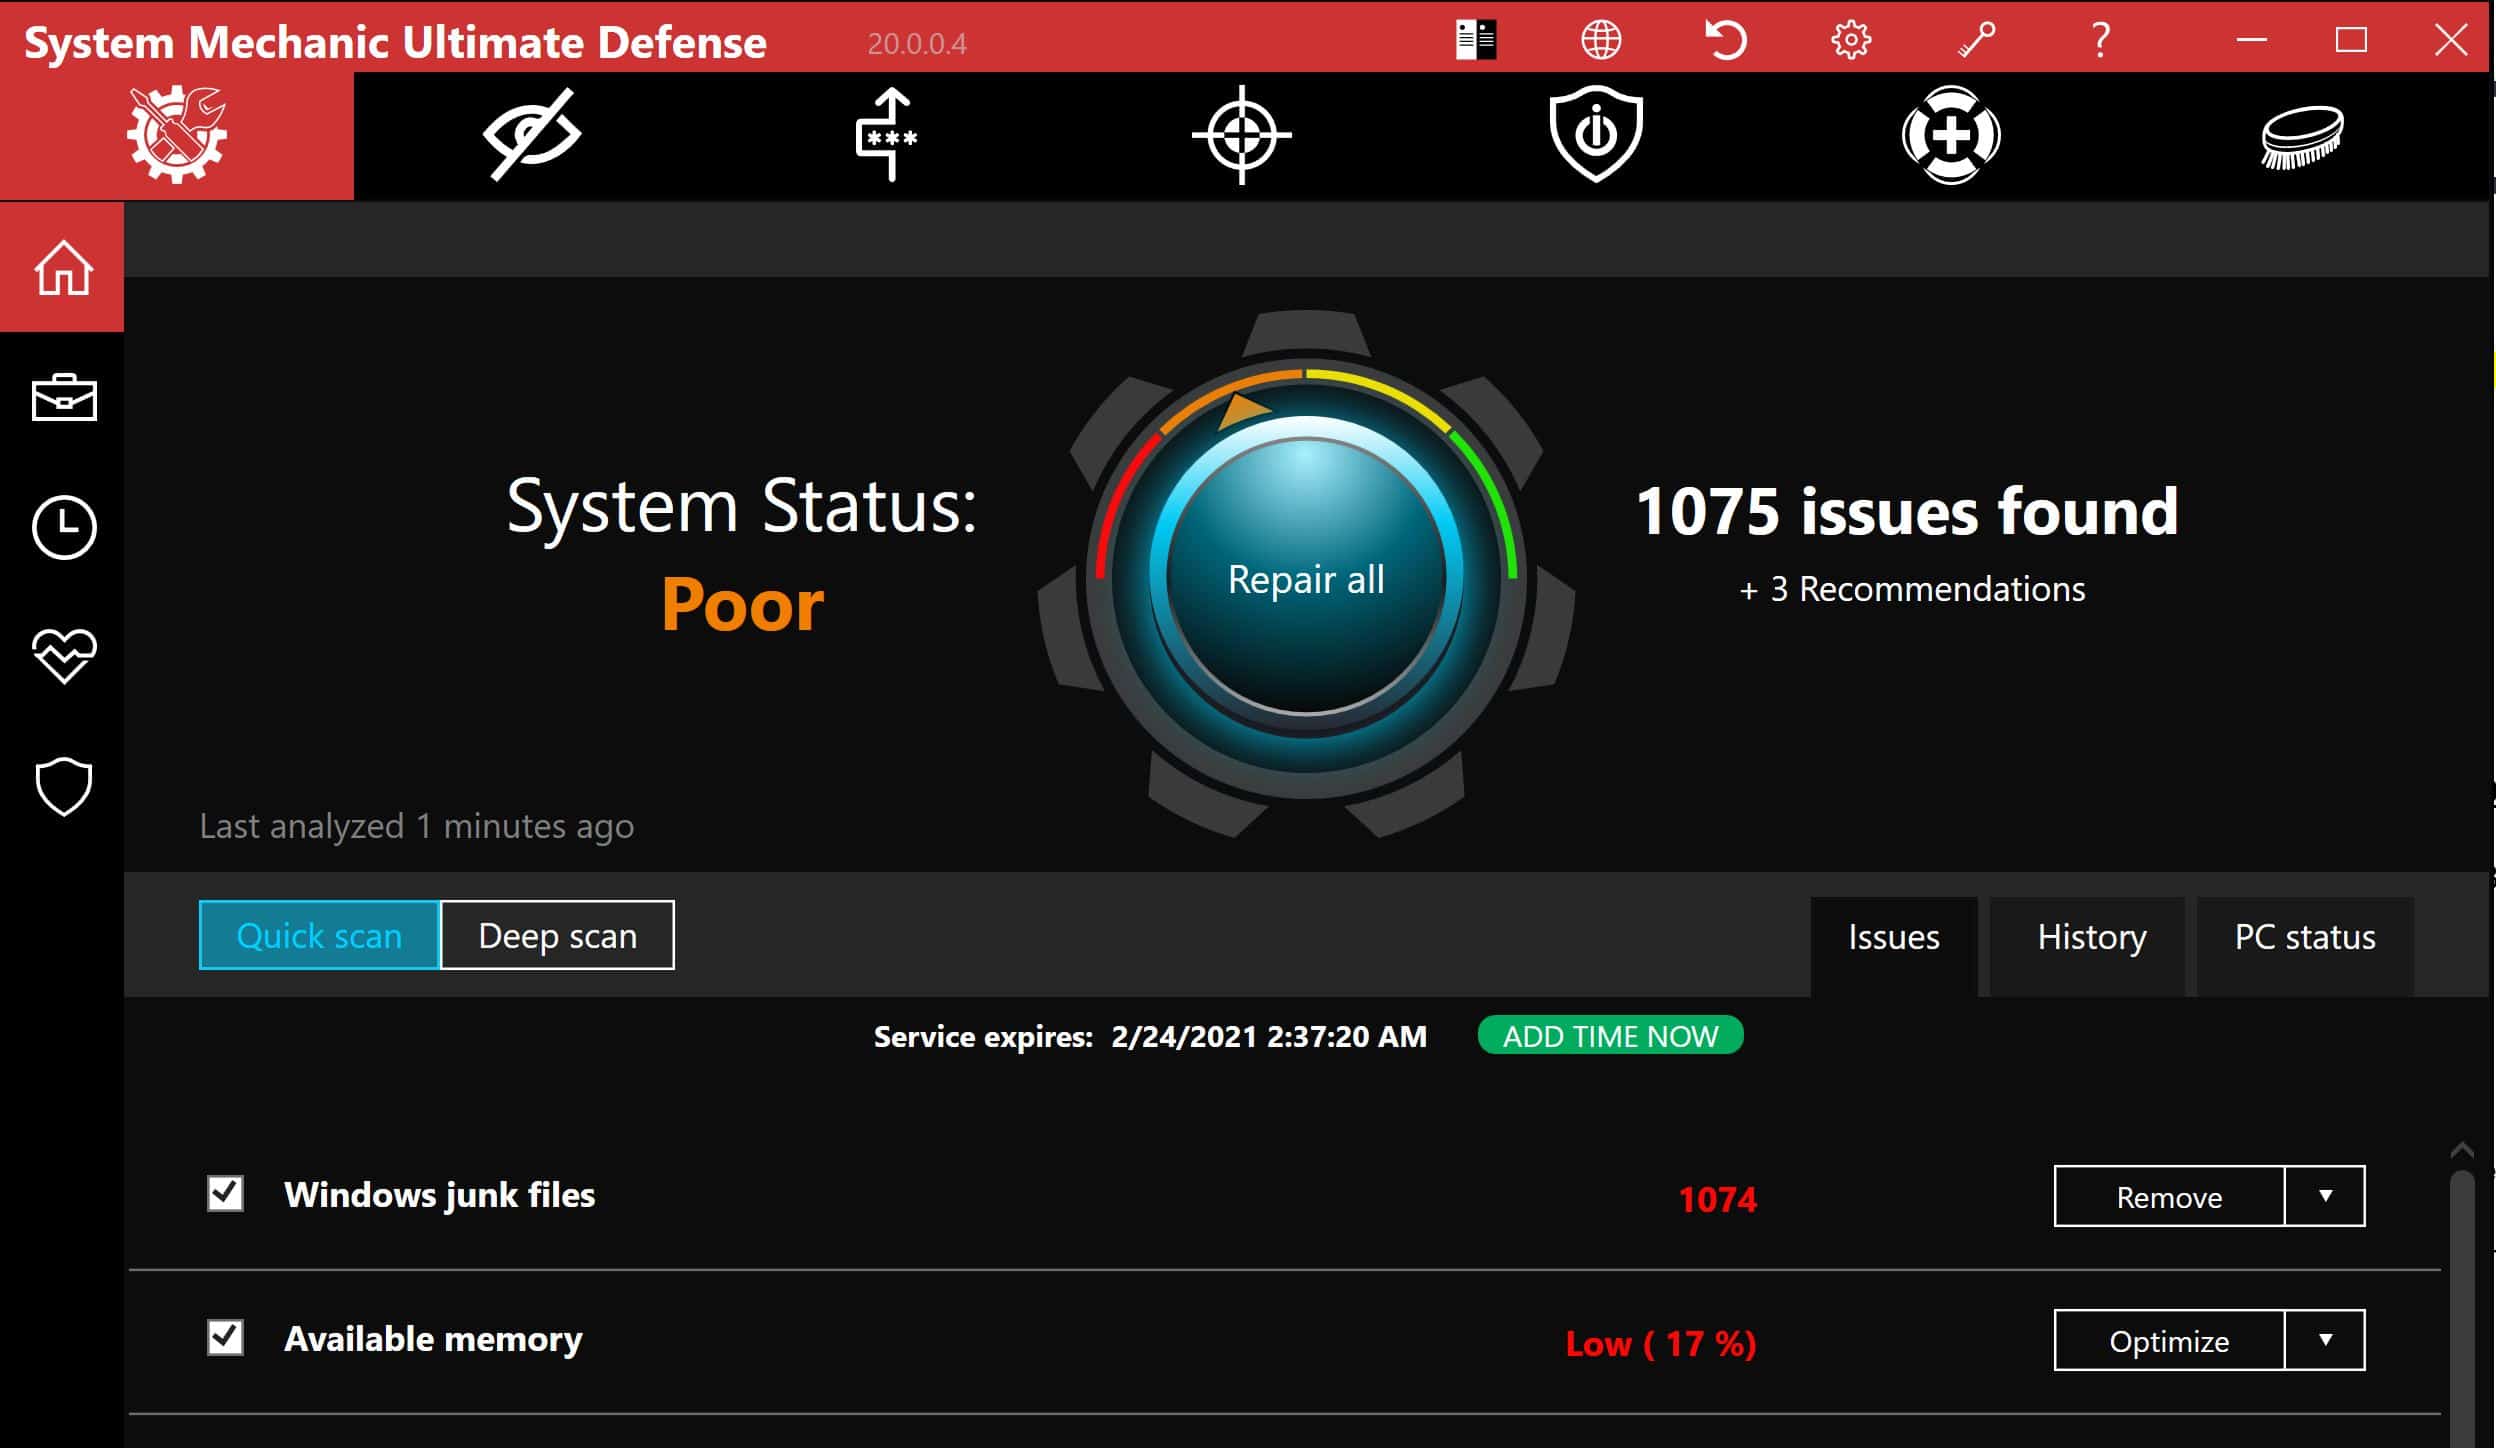
    Iolo system mechanic

    It has lots of other features designed to boost your computer’s performance such as cleaning up your browsing history, optimizing settings and application processes, and defragmentation (see below). This software currently costs just $14.98 for a one-year subscription.

    10. Defragment your hard drive

    Over time, files on your hard drive become fragmented. As your computer now has to check in multiple places for the pieces, it can run more slowly. The term ‘defragment’ sounds a little dramatic, but it basically means putting those files back together so your system can run more efficiently.

    In fact, it’s something that Windows 10, 8, and 7 do automatically on a set schedule. The default schedule is once per week, but you can go in and manually run it if you suspect there’s an issue.

    First, it’s important to note that you only need to do this if your computer uses a traditional mechanical Hard Disk Drive (HDD). A Solid State Drive (SSD) works differently from an HDD, and there is no need for defragmentation. If you have both, only defragment the HDD.

    Go to My Computer and right-click the hard drive (by default named WINDOWS (C:) though you may have renamed it). Then go to Properties > Tools and under Optimize and defragment drive, click Optimize.
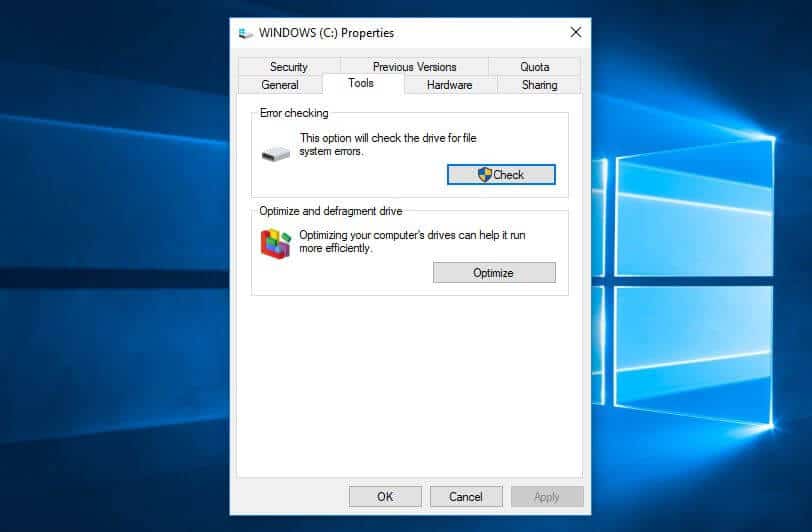
    The Tools tab of the drive properties screen.

    You’ll then get an Optimize Drives screen popup.
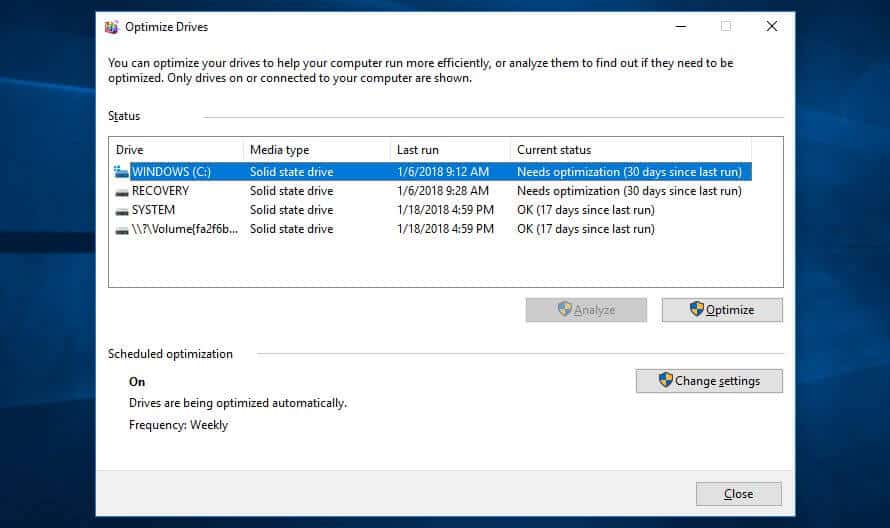
    A list of the drives to be optimizied.

    Note that in the above screenshot, all of the drives are SSD. These do not need to be defragmented. As in the image, Analyze will be grayed out for SSD drives, but will be available for hard drives.

    Select an HDD drive and click Analyze to see how fragmented it is. A good rule of thumb would be to keep it below five percent. If it’s above, you can click Optimize to defragment the disk.

    If you have an SSD, you’ll notice Optimize is actually an available option. Clicking it will run the TRIM command which will wipe data that is no longer considered in use.

    Windows 7: Look for Disk Defragmenter using the search bar and select an HDD under Current status.

    11. Adjust or disable graphics and animations

    More recent versions of Windows come with lots of graphics, including animations such as fading effects and flyouts. These help make the application appear more sleek and refined and contribute to a better overall user experience. On the other hand, they can also slow down your computer.

    Thankfully, it’s simple to adjust these settings and hopefully save a little processing power. Go to Control Panel > System and Security > System > Advanced system settings. Then, in the Performance section, hit Settings and you’ll have a full list of options.
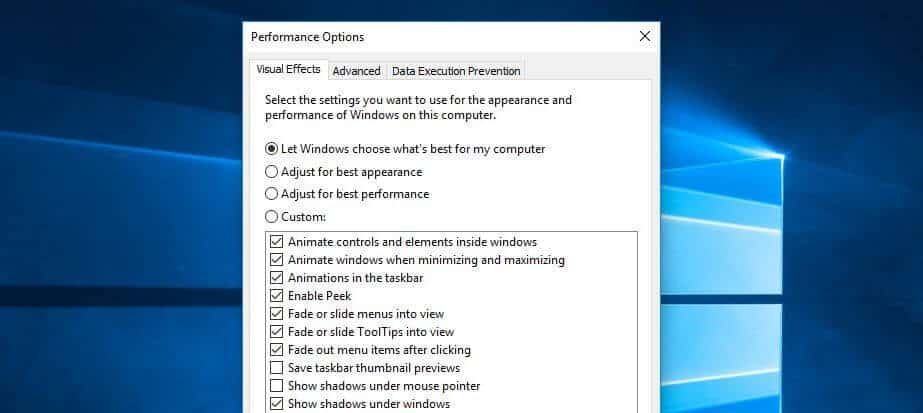
    The Visual Effects tab within Performance Options.

    You can select Adjust for best performance (this will remove all visual effects) or opt to remove some individually. It’s a matter of preference, but fade and shadow features are some you could probably live without.

    Windows 7: Search for Performance Information and Tools, select Adjust visual effects, and use the Visual Effects tab.

    12. Check for malware

    Malware (malicious software) is a broad term used to describe malicious programs that could cause harm to your computer. These may come from various sources, including email links, software downloads, and even ads (malvertisements). Aside from potentially causing permanent damage to your system, some forms of malware can cause your computer to run slow.

    Having good antivirus software installed can help protect against malware, as well as other threats. Some solid free options are available, so you don’t need to spend a penny.

    We particularly recommend Avira’s free tool, which scans for and removes malware and includes tuneup tools. This means it will protect your data and speed up your PC at the same time.

    If you’re willing to pay a fee for your antivirus software, we recommend NortonTotalAV, or McAfee.

    If you suspect malware is already affecting your computer, you can check for it using a scanner such as Zemana AntiMalware. You can then remove it using a removal tool like Malwarebytes Anti-Rootkit. We’ve tested both of these products and were very satisfied with the results.

    13. Disable Cortana

    While the Windows 10 digital assistant, Cortana, is a handy feature, it uses up a lot of resources and also poses a privacy threat. Cortana used to be easily removed but in the up-to-date versions, it’s a little trickier. Nonetheless, if you’re willing to make an edit to your system’s registry, it can be done.

    14. Upgrade your hardware

    If you’ve tried all of the tricks above, it might be time to invest in some new hardware. Here are a couple of things you may want to consider putting some money into:

    • Add an SSD: While HDDs offer more space for a lower price, adding an SSD can make your computer run much faster.
    • Add more RAM: If you have an older system, it may have too little memory to run modern applications efficiently. What’s more, if you use a lot of programs simultaneously, you might not have enough Random Access Memory (RAM) to carry you through. Installing a new RAM kit could give you the boost you need.
    • 288 views
    • 1 answers
    • 0 votes
  • Asked on May 27, 2021 in Facebook.

    How do I know if my Facebook account has been disabled?

    If your Facebook account has been disabled, you’ll see a message saying your account is disabled when you try to log in. If you don’t see a disabled message when you try to log in, you might be having a different login problem. Learn how to fix problems with logging in.

    Why is my account disabled?

    We disable Facebook accounts that might not follow the Facebook Terms. Some examples include:

    • Posting content that doesn’t follow the Facebook Terms.
    • Using a fake name.
    • Impersonating someone.
    • Continuing behavior that’s not allowed on Facebook and goes against our Community Standards.
    • Contacting other people for the purpose of harassment, advertising, promoting, or other conduct that’s not allowed.

    What can I do if my account has been disabled?

    If you think your account was disabled by mistake, please use this form to request a review.

    Keep in mind that in some cases we may not issue a warning before disabling your account. We also can’t restore accounts that were disabled for severe violations. Learn more about how we define severe violations from the Facebook Community Standards.

    • 289 views
    • 1 answers
    • 0 votes
  • Asked on May 18, 2021 in Mobile.

    Clean the fingerprint module.

    Just as having a clean finger, the fingerprint module should also be clean. Especially if you used a moisturizer earlier, the module would accumulate liquid from your fingers, causing the sensor not to read your fingers properly. To fix this, kindly check if the fingerprint module has any liquid or dirt and clean it with a dry cloth. If the dirt is sticking to the module, gently clean it with wipes or a damp cloth wetted with alcohol (or little water if there’s no alcohol). Do not scratch the module with hard/sharp objects in order not to damage it permanently.

    Check if the fingerprint module is well connected.

    As you already know, the module needs to be well connected for it to work properly. If you use a phone with a physical fingerprint or touch ID, try checking if the module is well connected. On most Android phones, the module is just as hard as the back panel. So if your fingerprint module is clickable or shaking, you should visit the repair center as soon as possible. This is the same true for the touch ID, if you feel like the fingerprint module doesn’t feel as it used to be when you first purchased the phone, kindly visit a repair center also.

    Restart your device.

    After ruling out the cause of the problem to be a dirty finger or module, you should restart your phone. This will surely help out if the “android fingerprint not working” problem is software-related – usually when you’ve not restarted your phone for a while. And it’s worth giving a try since it can help fix lots of software related issues like this.

    Just hold the power button and restart your phone. Also, on some Android phones, you can long-press the power button for about 10s to automatically reboot your device.

    Update your software.

    Another software-related issue that may cause the “ fingerprint sensor not working” issue is a software bug. Try checking if you have a pending update on your device and install it. Also, if the problem started after installing a system update, you may wait for the next update to fix the problem or roll-back to the previous update.

    To install an update, kindly open the Settings app, tap on ‘System’, select ‘System Update’, download and install any pending update.

    Wipe System cache

    In case your Android fingerprint is still not working, you might need to clear your phone system cache. Normally, this doesn’t do any harm to your phone; it just clears the stored frequently accessed data by apps and the system. And you should do it often after every system update.

    Follow the steps below to wipe system cache on Android in recovery mode.

    • Firstly shut down your device.
    • Boot to Recovery mode by pressing the Volume upPower button simultaneously. (This varies depending on the phone you use. You may need to search online on how to boot to recovery mode on your phone if that doesn’t work for you.)
    • Select Wipe Cache Partition using the Volume buttons and confirm with the power button.
    • Reboot your device after the partition is wiped successfully.

    Now try using the fingerprint now to check if it works.

     touch id is not working

    Recalibrate the fingerprint.

    Especially if what you do is industrial work, there might have been some changes to your fingers recently – like noticeable marks/lines – that are interfering with the registered fingerprint. In this case, you should add another fingerprint from your phone settings. Most Android phones may also allow you to add up to five different fingerprints to unlock your phone. So when the touch id is not working on Android, kingly take the advantage and add another fingerprint or delete the existing one and add it again.

    To do this, kindly open the Settings app, select “Security”, tap on “Fingerprint”, and add a new fingerprint.

    If you could add another fingerprint, it should be able to unlock your device now.

    Reset your device.

    Resetting your device may guarantee fixes for software related issues like this. Trying the above fixes should help get your phone fingerprint working again, otherwise, it’s worth giving ‘Factory Reset’ a try.

    • 263 views
    • 1 answers
    • 0 votes
  • Asked on May 13, 2021 in Computer.

    Before you begin

    Before working through the possible solutions listed, do these first:

    • Check for updates. Select Start , then select Settings  > Update & Security  > Windows Update  > Check for updates. If you see the option to View optional updates, select it to see if there are updates available for your camera. Allow available updates to install, then restart your device when it’s ready.
    • Restart your PC. If you haven’t restarted your device since the camera stopped working, you should do so. Select Start , then select Power  Restart. Waking up your device from sleep isn’t the same thing as a restart.
    • Test your camera with the Camera app. Select Start , then choose Camera from the list of apps. If you’re asked to allow access to the Camera, select Yes. If the camera works in the Camera app, the problem might be with the app you’re trying to use.

      Open Camera

    If your camera still doesn’t work, here are some other things to try. For best results, try the possible fixes in the order presented.

    Check for a camera switch or button your device

    Some laptops and portable devices have a physical switch or button that turns the camera on or off. When turned off, your device won’t recognize that there’s a camera installed. If your computer has a switch or button, make sure it’s in the on position before using your camera.

    Check your settings

    Give your apps permission

    If you recently updated Windows 10, you might need to give apps permission to use the camera. In newer versions of Windows 10, some apps don’t have default access to the camera.

    To let your device access the camera, select Start , then select Settings  > Privacy  > Camera . In Allow access to the camera on this device, if Camera access for this device is turned off, select Change and turn on Camera access for this device.

    Allow access to the camera on this device

    Note: If camera access for the device is turned off and you can’t select Change, you’ll need an administrator on the device to turn on camera access for you.

    Before any app can access your camera, make sure camera access is turned on for apps in your user account. Make sure that Allow apps to access your camera is turned on.

    After allowing access to the camera, go to Choose which Microsoft Store apps can access your camera and turn on camera access for the apps you want. Only apps installed from the Microsoft Store will show in this list.

    If you installed the app from the internet, a disc, a USB drive, or your IT administrator installed the app for you, it might not be a Microsoft Store app. To check, go to Allow desktop apps access to your camera and make sure it’s turned on. Many video conferencing apps, like Microsoft Teams, are desktop apps that require this setting to be turned on.

    To learn how you can configure your camera privacy settings in Windows 10, go to this Windows Community (in English) page.

    Check your antivirus software

    In your antivirus software settings, look for settings that block access to your camera or permission to use your camera. For help, visit your antivirus software company’s website.

    Check your hardware drivers

    Try a different USB port and scan for hardware changes

    If you’re using an external camera, try using it with a different USB port on your device first. If that doesn’t work, or your camera is built-in to your device, try this:

    1. Select Start , enter device manager, then select it from the search results.
    2. Find your camera under Cameras, Imaging devices or Sound, video and game controllers.
    3. If you can’t find your camera, select the Action menu, then select Scan for hardware changes.
    4. Wait for it to scan and reinstall updated drivers, restart your device, then try opening the Camera app again.
    5. If these steps don’t fix your issue, continue to the next steps.

    Check for an incompatible camera driver

    Some older cameras that were designed for older devices aren’t compatible with Windows 10. Here’s how to check if you have if your camera is compatible:

    1. In Device Manager, look for your camera under Cameras, Imaging devices or Sound, video and game controllers.
    2. Press and hold (or right-click) the name of your camera, and then select Properties.
    3. Select the Driver tab, select the Driver Details button, and look for a file name that includes stream.sys. If it’s there, your camera was designed before Windows 7 and you’ll have to replace it with a newer camera.
    4. If you don’t find a file name that includes stream.sys, continue to the next steps.

    Roll back the camera driver

    If your camera stopped working after an update, try these steps:

    1. In Device Manager, press and hold (or right-click) your camera, and then select Properties.
    2. Select the Driver tab, select Roll Back Driver, and then choose Yes. (Some drivers don’t provide this option. If your driver doesn’t have Roll Back Driver available, go ahead to the next fix.)
    3. After the roll back is complete, restart your device, and then try opening the Camera app again.
    4. If rolling back didn’t work or isn’t available, continue to the next steps.

    Uninstall your camera driver and scan for hardware changes

    1. In Device Manager, press and hold (or right-click) your camera, and then select Properties.
    2. Select the Driver tab, then select Uninstall Device. Select the check box for Delete the driver software for this device, then select OK.
    3. In Device Manager, on the Action menu, select Scan for hardware changes.
    4. Wait for it to scan and reinstall updated drivers, restart your PC, and then try opening the Camera app again.

    Note: If your camera still doesn’t work, look for help on the camera manufacturer’s website.

    • 300 views
    • 1 answers
    • 0 votes
  • Asked on May 9, 2021 in Computer.


    1. Go to the Windows Start menu and click the Settings icon.
    2. Click Apps, then choose Default Apps on the left pane.
    3. Scroll down and click the entry under Web browser.
    4. Click on Firefox in the dialog that opens with a list of available browsers.
    5. Firefox is now listed as your default browser. Close the Settings window to save your changes.


    • 300 views
    • 1 answers
    • 0 votes
  • Asked on May 6, 2021 in Solution.

    পদ্মা রিসোর্ট

    পদ্মা রিসোর্ট ঢাকা বিভাগের মুন্সিগঞ্জ জেলার লৌহজং উপজেলায় পদ্না নদীর পাড়ে অবস্থিত । নদী পাড়ের ও কাঁশফুলের অপূর্ব দৃশ্য যারা খুঁজে বেড়ান, তাঁরা চাইলেই ঢু মেরে আসতে পারেন এখান থেকে । গাড়ি নিয়ে ঢাকা থেকে ২ ঘন্টার মধ্যেই পৌছে যাবেন । কটেজের ভিতরে আছে রেস্টুরেন্ট, রিভার ক্রুজ ও খেলাধূলা করার বিশাল জায়গা ।

    ড্রিম হলিডে পার্ক

    ড্রিম হলিডে পার্ক ঢাকার পাশেই নরসিংদী জেলায় অবস্থিত অন্যতম থিম পার্ক । পরিবার পরিজনদের সারাদিন হৈচৈ আর আনন্দে মাতামাতি করতে অথবা পিকনিকের অায়োজন করতে চাইলে ঘুরে আসতে পারেন এখান থেকে । রাতে থাকার জন্য রয়েছে রিসোর্টের ও সুব্যবস্থা আর প্রবেশমুল্য জনপ্রতি ২০০ টাকা করে ।

    বালিয়াটি জমিদার বাড়ি

    ঢাকা থেকে ৩৫ কিলোমিটার দূরে মানিকগঞ্জ জেলার সাটুরিয়া উপজেলায় বালিয়াটি গ্রামে বালিয়াটি জমিদার বাড়ি অবস্থিত । এই জমিদার বাড়ির বিশাল সব স্থাপনা আপনাকে নি:সন্দেহে অবাক করবে । প্রতি সপ্তাহে রোববার ও সোমবার অর্ধবেলা ছাড়া প্রতিদিনই সকাল ৯.০০টা থেকে বিকাল ৫.০০ টা পর্যন্ত গেট দর্শনার্থীদের জন্য গেট উন্মুক্ত থাকে ।

    যমুনা রিসোর্ট

    যমুনা রিসোর্ট টাঙ্গাইল ও সিরাজগঞ্জ জেলার মাঝে যমুনা সেতুর কাছেই অবস্থিত । পর্যটকদের থাকার ব্যবস্থা ছাড়াও ভিতরে রয়েছে সুইমিং পুল, খেলাধুলার ব্যবস্থা, জিম ও অন্যান্য সুবিধা । খরচ পড়বে জনপ্রতি ৪০০০ টাকা করে ।  এছাড়া, বিভিন্ন উৎসব-অনুষ্ঠানেও রিসোর্টটি বিভিন্ন ধরনের প্যাকেজের সুবিধা দিয়ে থাকে ।

    বঙ্গবন্ধু সাফারি পার্ক

    ঢাকা-ময়মনসিংহ মহাসড়কের বাঘের বাজার থেকে মাত্র ৫ কিলোমিটার পশ্চিমে বঙ্গবন্ধু সাফারি পার্কটি অবস্থিত। পার্কের ভিতরের অংশকে আবার ৫টি অংশে ভাগ করা হয়েছে – কোর সাফারি, সাফারি কিংডম, বায়োডাইভার্সিটি পার্ক, এক্সটেনসিভ এশিয়ান ডাইভার্সিটি পার্ক ও বঙ্গবন্ধু স্কয়ার। প্রবেশমুল্য জনপ্রতি ৫০ টাকা।

    নিকলী হাওর

    খোলামেলা পরিবেশে স্নিগ্ধ প্রকৃতির ছোঁয়া পেতে ঘুরে আসতে পারেন কিশোরগঞ্জের নিকলী হাওর থেকে । ঢাকা থেকে বাসে বা ট্রেনে যেতে পারেন কিশোরগঞ্জ শহরে, সেখান থেকে সিএনজি তে করে নিকলি ঘাট । ঘাট থেকে নৌকা ভাড়া করে ঘুরে দেখুন হাওর । মনে রাখবেন, বর্ষার শেষ দিকে হাওর ভ্রমনের উপযুক্ত সময় ।Car Rental Ad

    নকশী পল্লী

    নকশী পল্লী পূর্বাচর বালু নদীর  পাশে অবস্থিত । অনেকে এটিকে ঘোরার জায়গা মনে করলেও নকশী পল্লী মূলত: একটি রেস্তোরা । তবে প্রাকৃতিক সৌন্দর্যের কাছে এসে খাবার উপভোগ করা আপনাকে নি:সন্দেহে দিবে এক অসাধারণ অনুভূতি । তাছাড়া সময় পেলে বোটে করে ঘুরে বেড়াতে পারেন নদীতে ।

    জিন্দা পার্ক

    কম সময়ে ও কম খরচে ঘুরে আসার জন্য যেতে পারেন পূর্বাচল হাইওয়ের কাছেই নারায়নগঞ্জের রূপগঞ্জে অবস্থিত জিন্দা পার্ক। ঢাকা থেকে দুরত্ব মাত্র ৩৭ কিলোমিটার । খাওয়া দাওয়ার জন্য পার্কের ভিতরেই রেস্টুরেন্ট আছে । এছাড়া, রাতে থাকার জন্যেও আছে গেস্ট হাউজ । প্রবেশ টিকেট জনপ্রতি ১০০ টাকা ।

    • 755 views
    • 1 answers
    • 0 votes
  • Asked on May 2, 2021 in Mobile.
    Apple ID ছাড়া কোন অ্যাপস সেটা ফ্রী হলেও ইন্সটল করা যায় না। আবার বাংলাদেশ এর এড্রেস দিয়েও Apple ID বানানো যায় না। আর বানানো গেলেও সেই অ্যাপেল আইডি দিয়ে কিছুই কিনতে বা ফ্রীও কিছু ইন্সটল করতে পারবেন না। কারণ বাংলাদেশের জন্য কোন iTunes Store বা App Store নাই।
    নিচের স্টেপগুলো ফলো করে আপনি সহজে Apple ID বানাতে পারবেন সেটা আপনি যে দেশেই থাকেন না কেন। এই নিয়মটা United States এর iTunes Store এর জন্য করা। অন্য কোন দেশের জন্য অ্যাপেল আইডি বানাতে চাইলে এই নিয়ম দেখে লাভ নেই।
    তবে সবগুলো স্টেপ খুব ভালভাবে দেখুন। নিজে নিজে কোন কিছু বদলায়া করতে গেলে হবে না। প্রতিটা স্টেপ খুবই সাবধানে করুন।
    Step 1: প্রথমে আপনার আইফোনের Settings এ গিয়ে Store অথবা iTunes & App Stores থেকে কোন Apple ID যদি Sign In থাকে তাহলে তা Sign Out করে নিন। Apple ID তে ক্লিক করলেই Sign Out অপশন আসবে। কারণ কোন আইডি Sign In থাকলে নতুন আইডি বানানো যাবে না। এখানে Create New Apple ID অপশন আছে যা দিয়ে Apple ID বানাতে যাবেন না। তাহলে আপনার Credit or Debit Card এর ইনফর্মেশন চাইবে। তাই আমি যেভাবে বলছি তা ফলো করুন।
    Step 2: এবার আপনার আইফোন এর App Store অ্যাপস ওপেন করে Search এ গিয়ে Speedtest বা যেকোনো ফ্রী অ্যাপসের নাম লিখে সার্চ দিয়ে ঐ অ্যাপস এর Free তে টাচ করে Install App এ টাচ করলে কয়েকটা অপশন আসবে তা থেকে Create New Apple ID তে ক্লিক করুন। এখানে Country or Region থেকে Store United States থাকলে Next চেপে নিচের দিকে Agree তারপর আবার Agree তে চাপুন।
    Step 3: এখানে আপনার নিজের ইমেইল এড্রেস দিন যেটা আগে কখনো অ্যাপেল আইডি বানানোর জন্য ব্যাবহার করা হয় নি (সেই ইমেইল এর পাসওয়ার্ড জানা থাকতে হবে যাতে কোন ইমেইল পাঠালে দেখতে পারেন) তারপর Apple ID এর জন্য নতুন পাসওয়ার্ড (যার মধ্যে একটা বড় হাতের এবং একটা ছোট হাতের English Letter এবং একটা নাম্বার থাকতে হবে) দিন। পরের লাইনে ঐ একই পাসওয়ার্ড আবার দিন। এবার একটা একটা করে সিকিউরিটি প্রশ্ন সিলেক্ট করে তার উত্তর লিখুন। এই উত্তর গুলো অবশ্যই মনে রাখবেন আপনার পাসওয়ার্ড ভুলে গেলে এই উত্তর চাইবে তাই কোথাও লিখে রাখুন। Optional Rescue Email কেউ দিতে চাইলে আপনার অন্য কোন ইমেইল এড্রেস দিন, না দিলে খালি রাখুন তাতে কোন সমস্যা নেই। এবার আপনার জন্ম তারিখ দিন। এখন নিচের যে দুইটা Subcribe অপশন অন করা আছে তা অফ করে দিন। কারণ এই দুইটা অন থাকলে আপনার ইমেইলে তারা ইমেইল পাঠাবে কোন অ্যাপেল নিউজ থাকলে যা তেমন একটা দরকার নেই।
    Step 4: এখান থেকে Next চাপার পর এখানে None এ আগে থেকেই টিক দেয়া থাকবে। আর Code এর জায়গায় কিছু লিখতে হবে না। তারপর নিচের গুলো আমি যেভাবে লিখেছি ঠিক সেভাবে পুরন করুন। আর যদি কারো আমেরিকার অন্য কোন এড্রেস জানা থাকে তাও ব্যাবহার করতে পারেন।
    Title: Mr or Mrs
    First Name: আপনার নামের প্রথম অংশ।
    Last Name: আপনার নামের শেষ অংশ।
    Address: 2211 Hamilton Ave
    Address: কিছু দিতে হবে না।
    City: Hamilton
    State: NJ মানে নিউ জার্সি
    Zip Code: 08619
    Phone: 201 429-3560
    দিয়ে Next চাপলেই আপনার ইমেইল Verification এর জন্য আপনার ইমেইল এ আপনাকে একটা ইমেইল পাঠাবে। এখান থেকে Done চাপুন।
    Step 5: এবার আপনি যে ইমেইল এড্রেস দিয়ে অ্যাপেল আইডি খুলেছেন তা ওপেন করুন। দেখবেন আপনার ইমেইলে অ্যাপেল থেকে একটা ইমেইল এসেছে। সেই ইমেইল ওপেন করে Verify Now এ ক্লিক করলে আপনাকে যে পেজে নিয়ে যাবে বা যে পেজ ওপেন হবে তাতে আপনি যে ইমেইল দিয়ে অ্যাপেল আইডি বানাইছেন সেই ইমেইল এড্রেস আর অ্যাপেল আইডির জন্য যে পাসওয়ার্ড বানিয়েছেন সেই পাসওয়ার্ড দিয়ে Verify করলেই হয়ে গেল আপনার নতুন অ্যাপল আইডি। এখন App Store অ্যাপস থেকে একটা ফ্রী অ্যাপস ইন্সটল করে দেখেন অ্যাপেল আইডি দিয়ে অ্যাপস ইন্সটল করতে পারছেন কিনা।
    • 763 views
    • 1 answers
    • 0 votes
  • Asked on April 29, 2021 in Wordpress.

    These are the most popular premium WordPress themes for a reason, and whichever one you choose, you’ll be well on the way to creating a great website.

    1. Divi

    Divi is the flagship WordPress theme from the Elegant Themes team that can help you create any type of website with WordPress. As it comes with the Extra theme as well as a few useful plugins for $89, it’s a great value option.

    One of the best features of this popular premium WordPress theme is the integrated Divi Builder. This drag-and-drop tool makes it easy to create and design custom layouts for the pages of your WordPress website, including the homepage. Through the Divi Builder user interface, you can construct custom page layouts that are comprised of multiple rows and columns. Your layouts can then be populated with a range of modules.

    The Divi Builder modules that can be dropped into your custom layouts include basic options, such as a range of text and image layouts, buttons, galleries, and block quotes. However, the Divi Builder modules can also add more advanced features to your website, which you’d otherwise have to install additional plugins to gain access to. This includes slideshows, pricing tables, testimonials, email optin forms, animated counters, and much more.

    While the Divi WordPress theme and its builder tool do make creating your own custom designs from scratch straightforward, the growing selection of pre-built page templates provides a great foundation for your own layouts. These templates cover a wide range of scenarios, including multiple homepage layouts, plus all the essential pages any good website will need. Divi also includes full ecommerce support, making it a great choice for online shops.

    That’s not all Divi has to offer, though. A recent update saw a split testing tool added to the theme. Divi Leads allows you to carry out split testing to optimize the different elements of your website, helping to ensure your site delivers the best results possible. Divi is becoming increasingly portable too, making it a great choice for web designers who want to be able to quickly export and import their settings into a new project. This theme is positively brimming with features and possibilities, and you can get the full lowdown in our hands-on Divi review.

    Divi has been available for a few years now and has been regularly updated and improved since its release. As new features are added and improvements made, Divi keeps getting better and better. This – and its great value price tag – has helped make it a popular choice, which for many, is the best WordPress theme you can buy.

    More Info / Download Demo

    2. Newspaper

    Newspaper is one of the bestselling news and magazine style themes for WordPress. No matter what content you’ll be publishing on your website, from serious articles and reports, through to recipes, fashion, culture or travelogues, the Newspaper theme has a pre-built template to match.

    In fact, with so many different demos to choose from, there’s a great chance that your news or magazine website will have a look and feel that is perfectly suited to the type of content you are publishing. Once you’ve chosen a demo from the available options, you can then use the detailed customization settings to tweak the design to ensure it matches your vision.

    After a recent update, the Newspaper theme now comes with a brand-new drag-and-drop page builder designed to help you customize your site. The tagDiv Composer is specially built for news, magazine, and publishing websites, and comes with over 100 elements to ensure each article has the right look. This best-selling WordPress theme also has various pre-built template designs for posts and pages, all gathered into the tagDiv Cloud Library. With the custom widgets such as weather, currency exchange, popular posts, or range of social media ones, you can provide useful information to your visitors, while making it easy for them to find more of your content.

    If you want to monetize your website, the Newspaper theme includes an ad management tool and plenty of locations for displaying adverts. You also get to work with full-width page layouts, multiple headers, and top bar designs, not to mention a range of post templates to make your content more engaging.

    Newspaper has a wealth of features that will help you build a professional news and magazine website with WordPress.

    More Info / Download Demo

    3. Kalium

    Kalium has lots of premium demo website content that’s easy to customize.

    It is described as a creative theme for professionals, and this is reflected in the library of website demos that you get access to. Among the demos are options for agencies, photographers, architects, lawyers, bloggers, freelancers, and many other types of service providers.  The demos include all the content a typical website will need and not just the homepage template, as is sometimes the case with other themes.

    Importing the demo content into your WordPress dashboard is an easy and straightforward process. You can choose which content to add to your site, such as the pages, posts, settings, and widgets, to name just a few. This gives you lots of control over how the foundation of your new website will look.

    Thanks to a recent update, Kalium is even more flexible than before. While in the past you could easily customize the post and page content of your website, you can now use the integrated functionality of Kalium to edit the header area of your website. Due to this, it is possible to control what content is displayed there and how it is presented. The header editing work takes place through a modern drag-and-drop interface, so whether you’re experienced with this type of activity or not, you should be able to give your entire website a unique look.

    The new and improved version of Kalium has also been tweaked to improve load times. One potential problem with multipurpose themes like this is that they can sometimes load slowly. To overcome this, the developers of Kalium have reduced the size of the website files and used conditional file loading to help your site load as quickly as possible.

    If you want your professional website to have a creative look, Kalium is a theme to add to your shortlist.

    More Info / Download Demo

    4. Uncode

    Uncode has worked its way up the charts since its initial release to become of the most popular WordPress themes available today.

    To help it become one of the best-selling creative multi-purpose themes for WordPress, Uncode is packed with an ever-expanding list of features. First released in 2015, Uncode has been constantly updated and refined to remain a strong and consistent seller at the ThemeForest marketplace. Now on version 1.8, Uncode gives users a huge library of unique concepts or website demos to choose from for their own projects. Like many of the other best-selling WordPress themes in this collection, Uncode makes it very easy to import your choice of demo into your website dashboard. Simply make your selection, press a few buttons, and your site will be set up and ready to accept your content.

    To help you add your own personality to the Uncode demos, this theme includes the ever popular WPBakery Page Builder plugin – previously known as Visual Composer – that gives you the ability to customize the demo content through a drag-and-drop visual editor. As well as the page builder, there’s also a powerful theme options panel that gives you even more creative control over the appearance of your website, whatever type of site you’re working on, from ecommerce store to basic blog.

    Other premium tools in the Uncode package include the powerful Slider Revolution and LayerSlider slideshow builder plugins that will provide you with everything needed to add eye-catching presentations to your website. Uncode also works with all the best third-party plugins to ensure maximum compatibility with any tools you want to add to your site. The social media integration features should come in handy too, for anyone who wants to display content from their feeds on their WordPress website.

    With demos covering agency, portfolio, blog, ecommerce, and corporate projects, you really can create any type of WordPress website with the Uncode theme.

    More Info / Download Demo

    5. TheGem

    TheGem is a new addition to this collection of the most popular premium WordPress themes.

    With over 80 creative concepts to choose from, this multi-purpose theme can be used to create almost any type of website with WordPress. Spanning multiple categories and design styles, each of the website demos of TheGem has been built to a very high standard. In fact, it’s fair to say that individually, each of these demos could be sold separately. However, as it is, anyone who chooses TheGem gets access to a very impressive library of website demos.

    Thankfully, when setting up your website, TheGem makes it very easy to import this content. After doing so, you can then choose from over 400 creative templates for the homepage and inner content of your site. Customizing your site isn’t a problem either and the options on offer help explain why TheGem is one of the most popular premium WordPress themes available today.

    Despite a strong focus on design and pre-built content, the creators of TheGem haven’t overlooked the other essential aspects of producing a winning theme. If you do choose TheGem for your project, your website will load quickly, be optimized for the search engines, and of course, be highly mobile friendly. As you’d expect from a best-selling theme, TheGem has been designed to work fully with the leading third party plugins, such as WooCommerce, Contact Form 7, Yoast SEO, and more. The package also includes a good selection of useful premium plugins at no extra cost.

    Whatever type of website you’re creating, the demos of TheGem should be able to help you launch your project in style.

    More Info / Download Demo

    • 331 views
    • 1 answers
    • 0 votes