651
Points
Questions
22
Answers
43
-
Asked on October 4, 2023 in Google.
Way 1. Merge Google Drive Accounts to Increase Google Cloud Storage
Here we will show you the most effective way to increase Google Drive space for free first. How to increase Google Drive storage for free? If you don’t want to upgrade Google Drive right now and get more Google Drive storage space, it’s strongly recommended to try the free cloud backup service CBackup to merge multiple Google Drive accounts to increase Google Drive space for free. If you have enough Google Drive accounts, you could get 100 GB free cloud storage, even unlimited cloud storage.
And then you could backup files to Google Hybrid cloud with CBackup. And it supports Google Drive, OneDrive, Dropbox, etc., and FTP or SFTP.
Download CBackupWin 11/10/8.1/8/7/XPSecure DownloadStep 1. Add Google Drive Accounts to CBackup
1. Please create a new CBackup account for free and sign in to the CBackup desktop app.
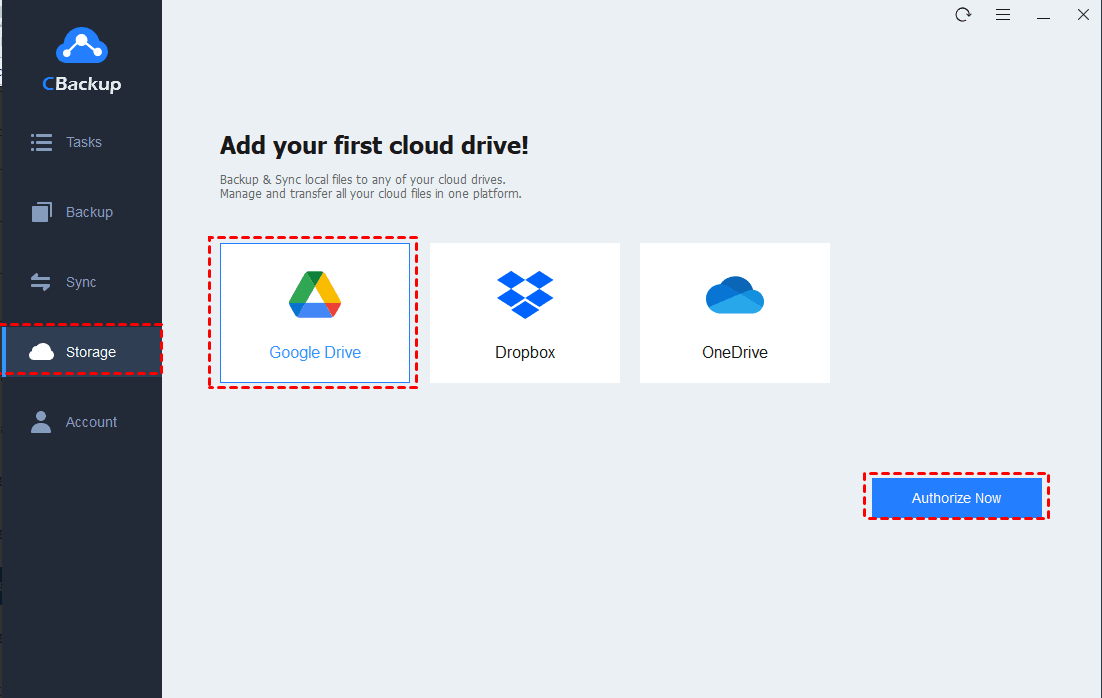
2. Select the Storage tab on the left, then choose Google Drive, and click Authorize Now. Then follow the guide to grant authority to CBackup, which allows CBackup to access your Google Drive files.
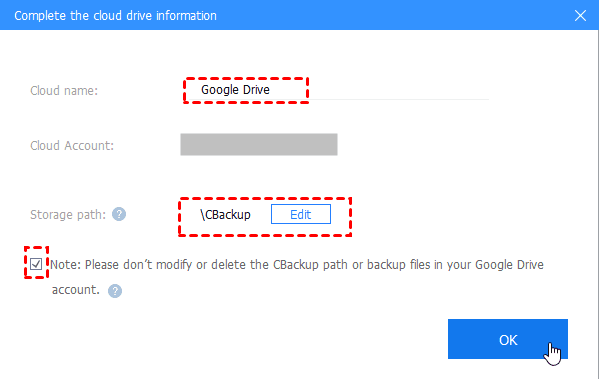
3. Edit the Cloud name and Storage path for the added Google Drive, and tick the option “Note: Please don’t modify or delete the CBackup path or backup files in your Google Drive account”, and click OK.
4. Repeat the process of Steps 2 and 3 to add more Google Drive accounts.
Step 2. Increase Google Drive Space for Free
Now you could Increase Google Drive space through the following steps:
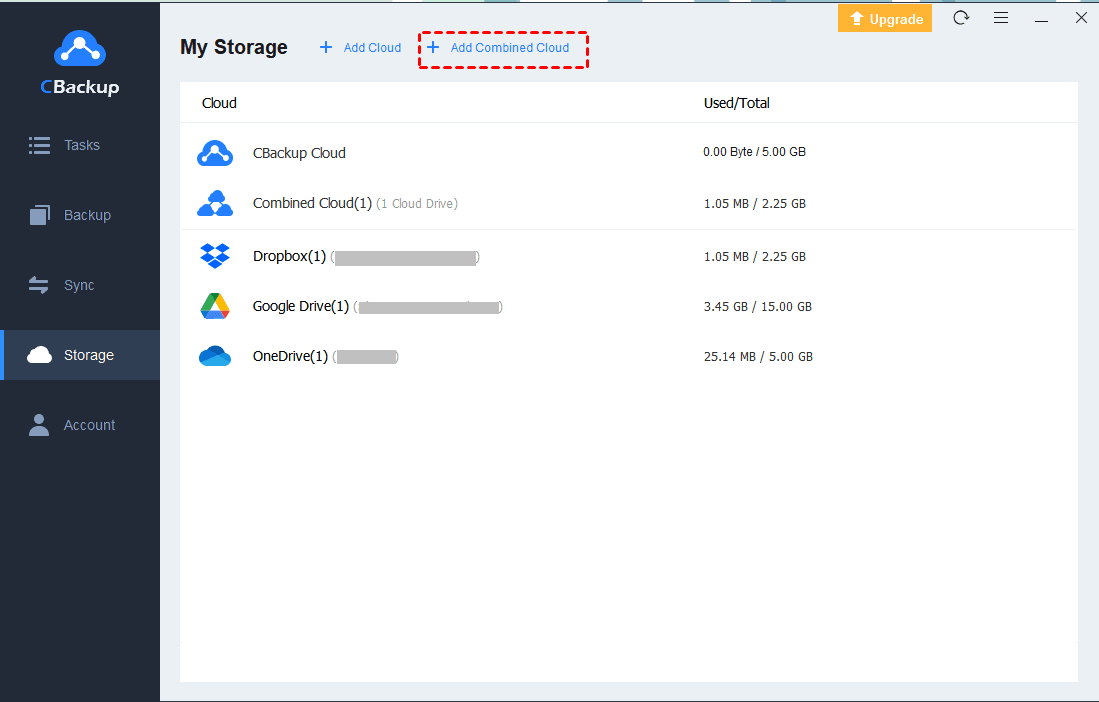
1. Tap Storage > + Add Combined Cloud.
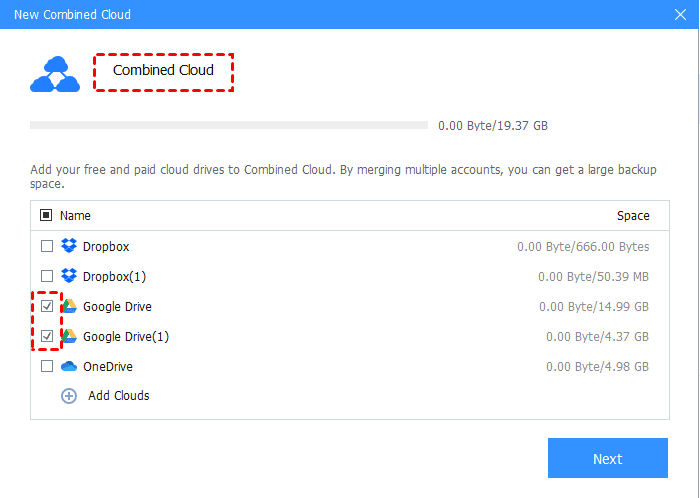
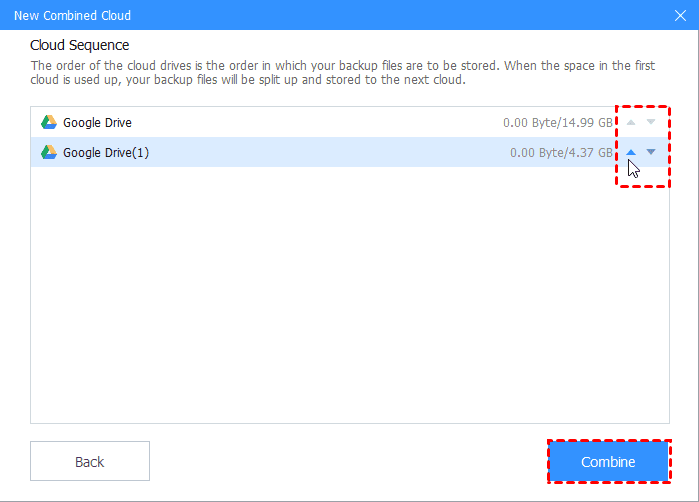
2. Rename the combined cloud, tick all your Google Drive accounts you added before, and click Next.
3. Choose the Google Drive accounts priority to store files, hover over the Google Drive you want to change priority, tap the up triangle icon or down triangle icon to set the priority, and hit Combine.
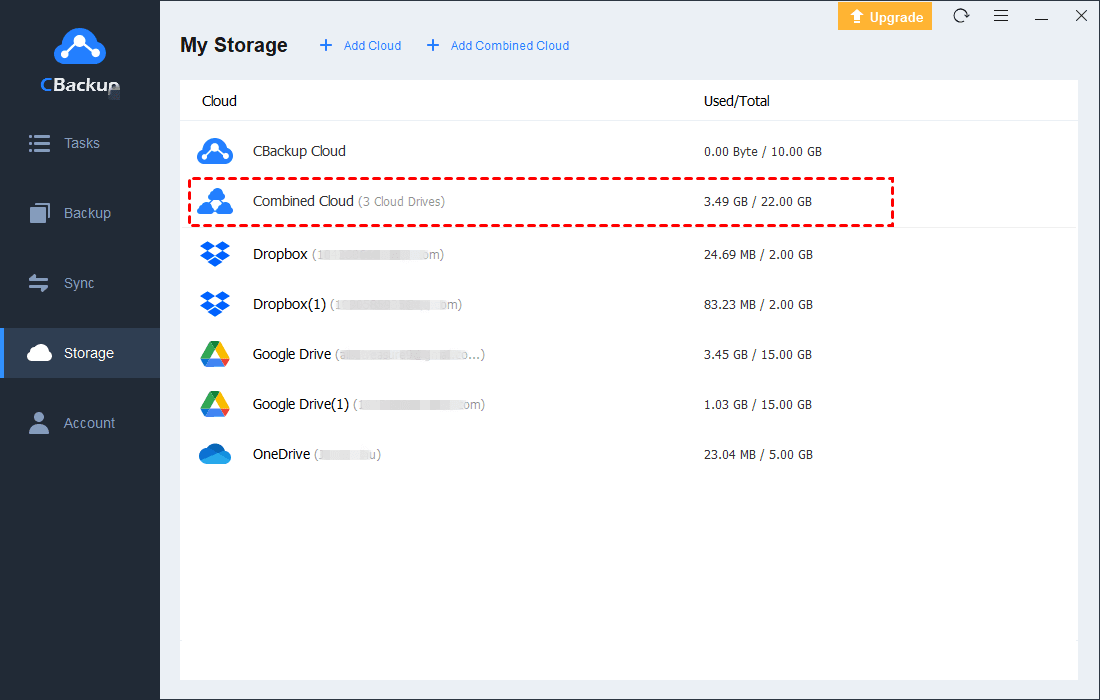
Now, your Google Drive storage has been increased for free with CBackup, that’s a Google combined cloud listed under Storage.
- 316 views
- 1 answers
- 0 votes
-
Asked on September 27, 2023 in Education.
Here are some of the best Chrome extensions for a student:
- Grammarly: Grammarly helps you catch grammar, spelling, and punctuation errors in your writing. It can also help you improve your writing style and clarity.
- QuillBot: QuillBot is a powerful paraphrasing tool that can help you rewrite your sentences and paragraphs in different ways. It is a great tool for students who are writing essays or reports.
- Kami: Kami is a PDF annotation tool that allows you to highlight, comment, and draw on PDFs. It is a great tool for students who are taking notes or working on research papers.
- Todoist: Todoist is a to-do list app that helps you stay organized and on track with your studies. It allows you to create to-do lists, set deadlines, and track your progress.
- Noisli: Noisli is a background noise generator that can help you focus and concentrate on your studies. It offers a variety of different sounds, such as rainfall, coffee shop noise, and forest sounds.
- Cite This For Me: Cite This For Me helps you generate citations for your research papers in a variety of different styles, such as MLA, APA, and Chicago.
- OneTab: OneTab helps you save and manage your open tabs. This can be useful for students who have a lot of different tabs open at once.
- Google Scholar Button: The Google Scholar Button allows you to quickly search for scholarly articles from Google Scholar.
- Screencastify: Screencastify allows you to record your screen and create videos. This can be useful for students who want to create video tutorials or presentations.
- Loom: Loom is another screen recording tool that is popular with students. It allows you to record your screen and audio, and then share the recordings with others.
- 355 views
- 1 answers
- 0 votes
-
Asked on September 27, 2023 in Solution.
To download a Facebook video without any software in a mobile phone, you can use the following steps:
- Open the Facebook app and find the video you want to download.
- Tap the three dots in the top right corner of the video and select Copy Link.
- Open a web browser on your phone and go to a Facebook video downloader website, such as FBDownloader or FBDown.
- Paste the copied link into the input box on the website and click Download.
- Select the video quality you want to download and tap Download.
- The video will be downloaded to your phone’s gallery.
- 384 views
- 1 answers
- 0 votes
-
Asked on September 27, 2023 in Website.
Front-end development and back-end development are two distinct roles in web development, each focusing on different aspects of a web application. Here are the key differences between front-end and back-end development:
Front-End Development:
- User Interface (UI):
- Front-end developers primarily focus on creating the user interface (UI) of a website or web application. This includes designing and building the layout, visual elements, and user interactions that users see and interact with.
- Technologies and Languages:
- Front-end developers use a combination of HTML, CSS, and JavaScript to create and style web pages. They are responsible for ensuring that the UI is visually appealing, responsive, and user-friendly.
- User Experience (UX):
- Front-end developers are concerned with optimizing the user experience. They work on making websites and apps intuitive, accessible, and responsive across different devices and screen sizes.
- Browser Compatibility:
- Ensuring that web applications work consistently across various web browsers is a critical part of front-end development. Front-end developers address compatibility issues to provide a seamless experience for users.
- Interactivity:
- JavaScript is a key tool for front-end developers to add interactivity to web pages. They create features like forms, animations, and client-side validation to enhance user engagement.
- Testing and Debugging:
- Front-end developers test and debug their code to identify and fix issues related to UI, layout, and user interactions. They may use browser developer tools and testing frameworks.
- Design Integration:
- Front-end developers collaborate closely with designers to implement the visual and interactive elements of a web application, ensuring that the design vision is realized.
- Client-Side:
- Front-end development is often referred to as client-side development because it deals with code that runs on the user’s device (client) and is responsible for rendering the UI.
Back-End Development:
- Server-Side Logic:
- Back-end developers focus on the server-side logic and functionality of a web application that users do not see directly. This includes handling data, managing databases, and processing requests.
- Technologies and Languages:
- Back-end developers use a variety of programming languages such as Python, Ruby, Java, PHP, Node.js, and more to build server-side applications. They also work with databases and server frameworks.
- Database Management:
- Back-end developers design and maintain databases, store and retrieve data, and ensure data integrity. They work with relational databases (e.g., MySQL, PostgreSQL) and NoSQL databases (e.g., MongoDB).
- 303 views
- 1 answers
- 0 votes
- User Interface (UI):
-
Asked on September 27, 2023 in Solution.
There are a few possible reasons why there might be no WiFi option in your laptop:
- The WiFi adapter is disabled. To check this, go to Control Panel > Network and Internet > Network and Sharing Center > Change adapter settings. Right-click on your WiFi adapter and select Enable.
- The WiFi adapter driver is missing or corrupted. To check this, open Device Manager (press Windows key + X and select Device Manager). Expand the Network adapters category and look for your WiFi adapter. If there is a yellow exclamation point next to it, then the driver is missing or corrupted. To fix this, you can try to update the driver automatically or download the driver from the manufacturer’s website.
- The WiFi adapter is broken. If you have tried all of the above steps and the WiFi option is still missing, then it is possible that the WiFi adapter is broken. In this case, you will need to have it repaired or replaced.
Here are some additional troubleshooting steps you can try:
- Restart your laptop. This can often fix minor software glitches.
- Restart your router and modem. This can also fix minor software glitches.
- Run the Network troubleshooter. To do this, go to Settings > Update & Security > Troubleshoot and select Internet Connections. Click Run the troubleshooter and follow the instructions.
- Update your Windows operating system. Microsoft regularly releases updates to Windows that can fix bugs and improve performance. To check for updates, go to Settings > Update & Security > Windows Update.
- Try connecting to a different WiFi network. If you can connect to a different WiFi network, then the problem is likely with the original network.
If you have tried all of the above steps and the WiFi option is still missing, then you may need to contact the manufacturer of your laptop for further assistance.
- 317 views
- 1 answers
- 0 votes
-
Asked on September 27, 2023 in Website.
Becoming a full-stack web developer means gaining proficiency in both front-end and back-end development. It’s a rewarding and versatile skill set that allows you to build and maintain entire web applications. Here’s a roadmap to help you become a full-stack web developer:
1. Learn the Basics of Web Development:
- HTML/CSS: Start with the basics of web development by learning HTML for structuring web pages and CSS for styling them. These are essential skills for front-end development.
- JavaScript: JavaScript is the programming language of the web. Learn it thoroughly as it’s used for adding interactivity to web pages.
2. Front-End Development:
- Responsive Web Design: Learn responsive web design techniques to create websites that work well on various screen sizes and devices.
- Front-End Frameworks: Familiarize yourself with popular front-end frameworks such as React, Angular, or Vue.js. These frameworks simplify front-end development and are in high demand.
- Version Control: Learn Git and GitHub to manage your code versions and collaborate with other developers.
3. Back-End Development:
- Server-Side Language: Choose a server-side programming language to learn. Common choices include JavaScript (Node.js), Python (Django or Flask), Ruby (Ruby on Rails), PHP, or Java (Spring).
- Databases: Learn how to work with databases. Understand SQL for relational databases (e.g., MySQL, PostgreSQL) and NoSQL databases (e.g., MongoDB).
- Server and Routing: Learn how to set up a server, handle routing, and create APIs. Familiarize yourself with RESTful API design.
- Authentication and Authorization: Understand user authentication and authorization mechanisms for secure applications.
- Web Frameworks: Explore back-end web frameworks like Express.js (Node.js), Django (Python), Ruby on Rails (Ruby), or Laravel (PHP) to streamline development.
4. Databases:
- Database Management: Learn how to create, manage, and query databases effectively.
- ORM (Object-Relational Mapping): Familiarize yourself with ORM libraries like Sequelize (Node.js), Django ORM (Python), or ActiveRecord (Ruby) for easier database interactions.
5. API Development:
- RESTful APIs: Learn how to design, build, and consume RESTful APIs for communication between the front end and back end.
6. Version Control:
- Continue to improve your Git skills. Practice branching, merging, and collaboration using Git and GitHub.
7. DevOps and Deployment:
- Learn about deployment processes, server setup, and DevOps practices. Explore cloud platforms like AWS, Azure, or Google Cloud for hosting web applications.
- Familiarize yourself with containerization and orchestration tools like Docker and Kubernetes.
8. Testing and Quality Assurance:
- Implement unit testing, integration testing, and end-to-end testing to ensure the reliability and quality of your applications.
9. Security:
- Study web security best practices, including cross-site scripting (XSS), SQL injection prevention, and authentication security.
10. Continuous Learning:
- Keep up with the latest web development trends and technologies. Attend conferences, read blogs, and participate in online forums and communities.
11. Build Projects:
- Apply your knowledge by working on personal or open-source projects. Building real-world applications is one of the best ways to solidify your skills.
12. Networking:
- Connect with other developers, attend meetups, and participate in online forums to learn from others and seek advice.
13. Portfolio:
- Create a portfolio website to showcase your projects and skills to potential employers or clients.
14. Job Search:
- Apply for entry-level or junior full-stack developer positions to gain professional experience.
15. Continuous Improvement:
- Keep learning and improving your skills as you work on real-world projects. The tech industry is constantly evolving, so adaptability and continuous learning are essential.
Becoming a full-stack web developer is a journey that requires dedication and ongoing learning. Start with the fundamentals, practice regularly, and gradually work your way up to more complex projects and technologies. Over time, you’ll develop the skills and expertise needed for a successful career as a full-stack developer.
- 301 views
- 1 answers
- 0 votes
-
Asked on September 27, 2023 in Mobile.
To use IMO (Imo.im) on your iPhone 6, you can follow these steps to install and set up the app:
- Download IMO:
- Open the App Store on your iPhone 6.
- In the App Store’s search bar, type “IMO” and press “Search.”
- Look for the IMO app in the search results, and tap on it.
- Tap the “Get” button next to the app to download and install it.
- Install IMO:
- After tapping “Get,” you may be prompted to enter your Apple ID password or use Face ID/Touch ID to confirm the download. Follow the on-screen instructions.
- Launch IMO:
- Once the installation is complete, tap the “Open” button to launch the IMO app.
- Sign Up or Log In:
- If you already have an IMO account, you can log in with your phone number or email address and password.
- If you’re new to IMO, you can sign up by providing your phone number and verifying it with a verification code sent to your number.
- Grant Permissions:
- IMO may request access to your contacts and notifications. To use the app effectively, you should grant these permissions.
- Add Contacts:
- After signing in, you can add contacts by tapping the “Add Friends” or “Contacts” icon within the app. You can invite friends by phone number or search for them by their IMO username.
- Start Messaging and Calling:
- Once you’ve added contacts, you can start sending text messages, making voice or video calls, and sharing media files.
- 258 views
- 1 answers
- 0 votes
- Download IMO:
-
Asked on September 27, 2023 in Solution.
You can easily transfer files from your mobile device to your PC without using a cable by using wireless methods such as Wi-Fi, Bluetooth, or cloud storage services. Here are several ways to do it:
1. Wi-Fi File Transfer Apps:
There are several apps available that allow you to transfer files between your mobile device and PC over a Wi-Fi connection. Some popular options include:
- AirDroid: AirDroid is a versatile app that allows you to manage your Android device from your PC’s web browser. You can transfer files, send text messages, and even mirror your phone’s screen.
- Send Anywhere: Send Anywhere is a straightforward file-sharing app that enables you to send files between devices using a unique six-digit key or a QR code.
- Feem: Feem is a cross-platform file-sharing app that works on Windows, macOS, Android, iOS, and Linux. It allows for easy file transfers between devices on the same Wi-Fi network.
- Snapdrop: Snapdrop is a web-based tool that works similarly to Apple’s AirDrop but is compatible with various devices and operating systems. Simply open the Snapdrop website on both your mobile device and PC to start transferring files.
To use these apps:
- Install the app on your mobile device.
- Ensure that both your mobile device and PC are connected to the same Wi-Fi network.
- Follow the app’s instructions to select and send files.
2. Bluetooth File Transfer:
You can use Bluetooth to transfer files between your mobile device and PC if both devices have Bluetooth capabilities. Here’s how:
- Enable Bluetooth on both your mobile device and PC.
- Pair the devices by going to your mobile device’s Bluetooth settings and selecting your PC as a paired device.
- Once paired, you can send files from your mobile device to your PC by selecting the file and choosing the option to send via Bluetooth.
Keep in mind that Bluetooth file transfers may be slower than Wi-Fi or other methods, especially for large files.
- 271 views
- 1 answers
- 0 votes
-
Asked on May 12, 2021 in Wordpress.
If you haven’t chosen a theme yet, head over to the WordPress theme directory. It holds official WordPress themes, that have been checked and inspected against WordPress theme guidelines. They are also free to download. There are thousands of themes in the directory; this is where the WordPress theme search function comes in handy.

Use the theme search bar if you know the name or style of theme you want. The Feature Filter in the theme search function will narrow down the results. You can select your preferred layout format, which features you need, and the subject of your site. You might be looking for a single-column layout for a photography blog that features an animated background, for example.
You might want to browse for inspiration using the tabs for Featured Themes, Most Popular Themes and the Latest Additions to the directory. For more options, use the theme search to browse commercially supported GPL themes. These paid services include more support and are fully compliant with the WordPress General Public License.
WordPress theme install
Before you can vamp up your site with themes, you need to install and activate them in your WordPress admin. These are the basic steps for most themes:
- Log in to your WordPress admin page, then go to Appearance and select Themes.
- To add a theme, click Add New. From this page, you have two ways to add a new theme. If you know the name of the theme you want, search for it in the Theme directory. If you don’t know your preferred theme’s name, use the Feature Filter to hone down your selection, check any tags and click Apply Filter for a screen filled with themes that meet your search criteria.
- To unlock a themes options, hover over it; you can either choose Preview to see a demo of the theme or install it by clicking the Install button once you’re ready. Once installed, click the Activate link.
- You’re all done, now preview your site to see how it looks.
We recommend reading through any instructions that come with your chosen theme regarding installation. Some themes will require more steps than others, going beyond the basic steps covered here. Follow the instructions provided, and if you run into any problems, contact the theme’s author for help.
Download WordPress themes
If you purchased a theme from a developer that operates outside of the WordPress themes directory, you need to upload it before installing. Follow these simple instructions to upload and install a theme.
- Begin by downloading the theme’s .zip file from the source onto your local computer.
- From your WordPress Administration area, head to Appearance > Themes and click Add New.

- The Add New theme screen has a new option, Upload Theme.

- The theme upload form is now open, click Choose File, select the theme zip file on your computer and click Install Now.

- The theme is now ready to be activated from your admin. Select the Appearance tab and open the Themes directory, locate the theme and click the Activate link.
- 346 views
- 1 answers
- 0 votes
-
Asked on April 17, 2021 in Website.
HTML is a markup language, and CSS hooks into this and is a styling language. Neither is an actual programming language, but rather they are document structures/styling formats.
Interactivity
If you want to create interactive websites, then you need to learn Javascript. Javascript is a general scripting language that has been embedded as the ONLY scripting choice for manipulating web pages (DOM) on all browsers. This is where is gained its “fame”, but you can find Javascript in other locals, such as Apple automation scripting (Yosemite) XSI (3D package) and Node.js (more on this later).Javascript within a browser allows you to modify elements, create them, delete them and style them (using classes + css). You can do pretty much anything, though there are limits, usually for security reasons. You are lucky, as there are many good books to learn from, downloadable onto Kindle etc in minutes, plus Stack Overflow etc will answer further questions.
Server Side
If you want to build the full site, then you may want to get into server side scripting. This makes things more complex of course, but it gives you “the full picture” i.e. being able to ask for data from the client via AJAX, and then see that call on the server and write the code that gets it from the database and serves it back to the client. This is called a full stack developer.I mentioned databases? Well most websites have a database behind them, on the server, so if you do want to code on the backend as well, then you need to also get familiar with SQL so you can make queries to a database and get back what you want.
For languages here, you are spoilt. There is Java, PHP, Ruby and more. A more recent development is Node.js, which is a Javascript server technology, which, if you want my advice, I would learn if I were starting from scratch. But learn front end Javascript first, then Node.js later. Its all too much to start off with.
My own journey through all of this started with an off the shelf e-store, that I needed for my online business. It was missing features, and it was proprietary, so I could change nothing. So I had to write some code in PHP on the server to export all its data to my local database. I then dumped it, installed my own server of Apache+PHP and imported that data into an open source e-store that I COULD modify and expand as I needed. I did this with some HTML and inline styles (this was 2006), and a lot of PHP.
A few years later, I worked on a project called Mapedia with a friend. A learning project, and here I first got deep into Javascript, DOM, AJAX and so on. Its a “single page app” meaning the site has one page, and all changes are via AJAX calls to the server and then DOM manipulation and addition via templates. It was a steep learning curve but ultimately it resulted in a finished site, Mapedia and a job working for a Silicon Valley leading startup.
So, choose your path and go for it. It will take time, but you have all the resources out there to make it. Eventually 😉
- 408 views
- 1 answers
- 0 votes

