rakib96's Profile

43669
Points

Questions
95

Answers
4273

  • Asked on September 20, 2021 in Graphic Design.

    Here Are 10 Common Graphic Design Mistakes To Avoid

    01. Not Understanding Instructions

    As in all things, communication between the designer and the client is critical. While it’s the prerogative of the client to provide clear and informative instructions, it’s the responsibility of the designer to ensure they understand those instructions, even if that requires additional queries sent to the client.


    Creative Bloq highly suggests going over the client directives multiple times while taking notes and brainstorming. Whenever something confusing crops up in the directives, it’s critical that you get in contact with the client right away in order to clear things up.

    02. Staying In The Box

    While thinking out-of-the-box may be a clichéd advice, that doesn’t mean it isn’t true. A major graphic design mistake in logo design and other designs is staying in the well-traveled ruts and sticking to what is known.

    Graphic design is a creative process, and as such, you need to be creative in order to truly be successful. Go for the crazy and weird, try things out, experiment and play around. Not everything will be a success, but nothing will be if you don’t try.


    03. Too Many Fonts

    Playing with fonts may be fun, but if someone is trying to read through something that changes font type ten times in a paragraph, it’ll get tiring and annoying quickly. Planet of the Web suggests using no more than three fonts in any single layout.


    It would be better to stick to just one, or maybe two fonts. A single font adds continuity, which is good. You should keep the number of fonts lower in business card design also where space is already tight.

    04. Overthinking Everything

    Just because you can add something to your design doesn’t mean you should. Simplicity has plenty of perks on its own. So, be careful about going crazy with the Photoshop filters. Over-designing isn’t a major mistake, but it can cause some serious problems.

    The more stuff in your design, the harder a viewer needs to think to extract the info. As Rasmussen College discusses, a design needs to breathe and flourish on its own. Having blank space isn’t necessarily bad, and in many cases, it’s better than filling every square inch of blank space with something.


    If your brochure design is crowded with too many images, fonts, and colors, try to keep them to the bare minimum. That will help customers focus on your key business features that you want to highlight.

    05. Over-Promise Then Under-Deliver

    Out of all the mistakes covered so far, this is by far one of the most severe and potentially damaging. As Go Layer Cake site states, when it comes to graphic design, you’ll rarely, if ever, find a job that is “quick.”

    So when discussing deadlines and expectations with your client, you’ll want to make sure you don’t promise them something amazing, and then fail to meet that promise. It’s better to finish a project ahead of a long deadline than late on a short deadline.

    For your design needs, you can always hire a freelance graphic designer with a good track record so that you don’t need to face and delays in your project.


    Instead, take your time. It is better to tell your client that you may take a lot of time in creating a design work. Do not make loud promises that arise their expectation to very high level.

    This way, you will be putting yourself under pressure in scheduling the work and quality of the design. For example, a website design takes many more days than work on a graphic design item like a logo.

    06. Kerning Your Fonts

    If you’ve never heard of kerning before, don’t worry, it’s very simple. According to We Design Studios, kerning is the process in typography where the space between letters in adjusted, either manually or automatically.


    Kerning is important because in some situations, adjusting the space between letters can make the wording more legible and pleasing to the eye. However, misusing kerning or not paying close attention to it can cause some major problems, from misinterpretations to destroying a design’s cohesiveness.

    07. Use Of Stock Images

    Ah, stock images. While it’s not wrong to use stock images, it’s best to go easy on them. Using too many stock photos makes a project look cheap and, in some cases, unprofessional. Plus, there are plenty of stock images out there that people will instantly recognize since they’ve seen them all over.


    Now, think of a packaging design having a stock image. Will the consumer buy that product? Probably not, since they get the message that the quality of the product may be inferior as is the design.

    08. Check For Spelling

    Yes, you are a graphic designer and not a writer, but that doesn’t give you an excuse to pass on proper spelling. While you may feel that running a quick spell check after finishing your project is all you’ll need, there are plenty of graphic design mistakes that spell check systems can miss.

    So follow Creative Pro’s advice, pay close attention to the details and comb over your project before sending things to print.


    For example, if you are distributing leaflets as part of your ad campaign, and if the leaflet design has many spelling mistakes in the text, it will backfire. The customers will not take those mistakes kindly. They may simply ignore your business as such silly spelling mistakes convey unprofessionalism.

    09. Grammar Issues

    Along with spelling problems, you want to make sure your project has proper grammar. While a misused comma or other punctuation marks may not seem like a major problem, there are plenty of people out there that will see a small slip like that and disregard the entire rest of the project.


    10. Designing For Yourself

    Finally, it is always absolutely imperative that you stay cognizant of the fact that you’re designing a project for a client. Whether you’re a freelancer or working with a site like Designhill, it’s incredibly important that you stick to the client instructions and don’t make changes because you think it looks better.

    As Rasmussen College states, the customer is paying for a graphic design, and your job as a designer is to do all you can to help the customer achieve their vision.


    It would be better if you send your graphic design work to Designhill, which is a leading marketplace. At this crowdsourcing site, you get your logo, website, brochure, business cards etc. designs at affordable prices. You get dozens of new design ideas from as many graphic designers. But if you do not like the designs, the site will refund your money under its 100% Money Back Guarantee policy.

    • 277 views
    • 1 answers
    • 0 votes
  • Asked on September 19, 2021 in Internet.

    Cookies are files created by websites you visit. They make your online experience easier by saving browsing information. With cookies, sites can keep you signed in, remember your site preferences, and give you locally relevant content.

    There are two types of cookies:

    • First-party cookies are created by the site you visit. The site is shown in the address bar.
    • Third-party cookies are created by other sites. These sites own some of the content, like ads or images, that you see on the webpage you visit.
    • 266 views
    • 1 answers
    • 0 votes
  • Asked on September 17, 2021 in YouTube.

    According to Matt Gielen of Frederator Networks, one of the most common questions he receives is, “When is the best time to post my videos?” Frederator Networks compiled data across their network of over 1,300 channels and 120,000,000 monthly views.

    They do recognize that their demographic skews more male in comparison to YouTube at large, although their average viewer age range of 13 to 34-year-olds is typical of YouTube’s audience as a whole. They also observe that their sample is 40% U.S.-based, which is double YouTube as a whole.

    Allowing for the above factors, Frederator Networks found the best times to post on YouTube to be:

    • Mondays 2-4 pm
    • Tuesdays 2-4 pm
    • Wednesdays 2-4 pm
    • Thursdays noon -3pm
    • Fridays noon -3pm
    • Saturdays 9 am-11 am
    • Sundays 9 am-11 am

    The best days to post, according to Frederator Networks, are Thursday and Friday.

    • 293 views
    • 1 answers
    • 0 votes
  • Asked on September 15, 2021 in Logo Design.

    Hello,

    I read some of the earlier answers and all of them are pretty technical. I don’t know why people give complicated answers to a very simple question. If you want to start learning logo designing. Focus on few things:

    1. Try to make icons, symbols or character with very basic shapes such as rectangle, square, circle.
    2. People prefer iconic logo so try to add 2–3 elements into one single meaningful mark. (in the attached image, I made an aeroplane with one corner of letter D)
    3. Learn how to play with letters, it will benefit you a lot. For above three points check this as an example:

    Once you realize that you are good at these things then you can study design principles, color theory, typography in order to get better as a professional designer. Always check if your design is following these 5 things:

    Image Source: Google

    Thank You.

    • 262 views
    • 1 answers
    • 0 votes
  • Asked on September 14, 2021 in Internet.

    You can add a number of popular, premade bots to your server. One of the most popular is MEE6.

    1. Visit this page to download MEE6.

    2. Click the button that says “Add to Discord.”

    discord1
    Select “Add to Discord” on the MEE6 homepage. 
    Jeremy Dreyfuss, Justin Gmoser/Business Insider

    3. Provide your Discord login to authenticate your account. If a pop-up asks for permission to use your account, click “Authorize.”

    discord2
    Make sure you’re logged into the correct account, and click “Authorize.” 
    Jeremy Dreyfuss, Justin Gmoser/Business Insider

    4. Click “Set up MEE6” next to your server name.

    discord3
    Click “Set up MEE6” next to the correct server. 
    Jeremy Dreyfuss, Justin Gmoser/Business Insider

    5. Select your server in the pop-up window and click “Continue.”

    discord4
    Choose your server and hit “Continue.” 
    Jeremy Dreyfuss, Justin Gmoser/Business Insider

    6. Select or deselect the permissions you’ll give this bot.

    7. Scroll down and click “Authorize.”

    discord5
    Click “Authorize.” 
    Jeremy Dreyfuss, Justin Gmoser/Business Insider

    How to set up MEE6 as a welcoming bot on Discord

    Once you authorize MEE6, you are given options of what kind of bot you can create. First, we’ll create a bot that welcomes new members to your server.

    1. Click the “Welcome” option.

    discord6
    To create a welcome bot, click the “Welcome” option. 
    Jeremy Dreyfuss, Justin Gmoser/Business Insider

    2. Select what you want the bot to do. Your options are: “Send a message when a user joins the server,” “Send a private message to new users,” “Give a role to new users” and “Send a message when a user leaves the server.”

    discord7
    Select a welcome task for the bot, such as “Send a message when a user joins the server.” 
    Jeremy Dreyfuss, Justin Gmoser/Business Insider

    3. You can set what your bot says down to the text color and font, as well as which channel your bot will post in.

    discord8
    Choose a channel for the bot to post in. 
    Jeremy Dreyfuss, Justin Gmoser/Business Insider

    4. Hit “Save” when finished. Visit this plug-ins page again if you want to make changes.

    discord10
    Click “Save” when you’re done. 
    Jeremy Dreyfuss, Justin Gmoser/Business Insider

    How to set up MEE6 as a moderating bot on Discord

    Circle back to the plug-ins page on the MEE6 website to set up your moderator bot. A moderator can do things like censor language and kick bad actors off of your server.

    1. Click on the “Moderator” icon.

    discord12
    Select “Moderator.” 
    Jeremy Dreyfuss, Justin Gmoser/Business Insider

    2. Then click “Yes” in the pop-up to enable it.

    3. Scroll down to “Auto-moderator” and select what rules you want your bot to enforce. Options include censoring bad words, spoilers, and excessive emojis.

    discord14
    In the “Auto-Moderator” section, you can choose what kind of actions you want moderated, such as “Bad words.” 
    Jeremy Dreyfuss, Justin Gmoser/Business Insider

    4. When selecting what your bot will moderate, you can decide how the bot reprimands users. The message can be automatically deleted, the user who triggered the auto-moderation can be sent a warning message, or both.

    discord15
    Choose how you want the action moderated. 
    Jeremy Dreyfuss, Justin Gmoser/Business Insider

    5. Click “Settings” to customize the threshold for what triggers the bot. For example, the bot can spring into action once a post has been marked with a certain number of spoiler tags. You can also select channels for the bot to ignore.

    6. Save any changes.

    How to set up MEE6 to alert users when you’re streaming on Twitch

    Discord began as a messaging platform for gamers, so streaming culture goes hand in hand with it. If you are a streamer, you can set up MEE6 to alert your server whenever you go live on the streaming site Twitch. First, revisit the MEE6 plug-ins page again.

    1. Scroll and click the Twitch icon.

    discord15
    Click on the “Twitch” option. 
    Jeremy Dreyfuss, Justin Gmoser/Business Insider

    2. Click “Yes” in the pop-up to enable it.

    3. Enter the name of your Twitch channel.

    discord16
    Type in the name of your channel. 
    Jeremy Dreyfuss, Justin Gmoser/Business Insider

    4. Customize a message to your server.

    5. Select a channel for the bot to post in.

    discord20
    Choose a channel. 
    Jeremy Dreyfuss, Justin Gmoser/Business Insider

    6. Choose whether or not you want to receive a Discord notification when someone follows the Twitch channel.

    7. Click “Save.”

    8. Now, when you go live on Twitch, everyone on your server will be notified.

    • 371 views
    • 1 answers
    • 0 votes
  • Asked on September 13, 2021 in Website.

    The best way to learn web/web-app development is not by learning it , but by Doing Projects.

    Yea you heard that right. Unlike other topics,web development can only be aced if you start making projects on your own. Here are some tips for the same-

    • go to youtube , watch some basic tutorials of HTML CSS / JS , then pick a project from youtube and try to code it on your own.
    • once comfortable with HTML/CSS etc, watch some tutorials of ReactJS and make some responsive project,like some portfolio website.
    • If possible , side by side also keep learning about Bootstrap , Tailwind CSS etc.
    • Now is the time for backend. I would say get started with Django since the learning curve is steeper. NodeJS has some concepts like promises and stuff which are bit difficult to understand for a beginner.
    • Also , learn about SQL / MongoDB and some basics of AWS,git etc.
    • Now is the time for Full stack projects. If possible make an amazon / flipkart clone. a lot of tutorials are available on the net. Go with MERN if possible. it is very popular. Thats it ig.

    Good youtube channels –

    CodeWithHarry
    Programming with Mosh
    Traversy Media
    Web Dev Simplified

    Thanks .

    • 243 views
    • 1 answers
    • 0 votes
  • Asked on September 12, 2021 in Technology.

    A quick search on Google Play throws up several webcam applications. We tried 5 of the top 10 results, but most didn’t work properly. From the ones that didn’t crash repeatedly, SmartCam failed to show the video, and DroidCam needs you to install an app on Windows to work.

    IP Webcam is easily the best of the lot because it works through your browser, which gives it the cross-platform compatibility.

    To set up a security camera on Android, follow these steps.

    1. Connect your computer and the phone to the same Wi-Fi network.

    2. Install the IP Webcam app on your smartphone.

    3. Close all other camera apps. Force close them from the app switcher before you proceed.

    4. Launch the IP Webcam app. Scroll to the bottom and tap Start server.

    5. The app will now fire up your phone’s camera and display a URL. Our URL was http://172.32.15.110:8080.

    6. Enter this URL in any browser on your computer and hit Enter.

    7. In the browser, you’ll see a drop down menu next to Video renderer. Select Browser.

    8. Below that, you’ll see Audio renderer. Select HTML wav.

    Now you’ll see a live video feed in your browser. You can also record this footage via the browser. To do this, just press the red Record button under the video. This saves the footage as an MP4.There will be a slight lag if you enable HTML wav audio in the browser. You can select the Flash option (doesn’t work on all computers) or open the same URL in VLC Media Player.

    9. To do this, first download and install VLC from this website. Then in VLC, go to Media > Network Stream and enter the URL from the app as seen in step 5.

    Once the app is running, you don’t need to keep your phone’s screen on. It works even when the phone is locked, but the video feed is slightly smoother when the screen is on.
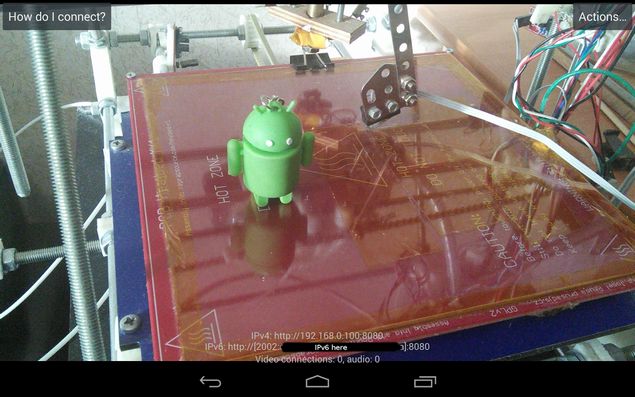
    ip_webcam_google_play.jpg

    iOS

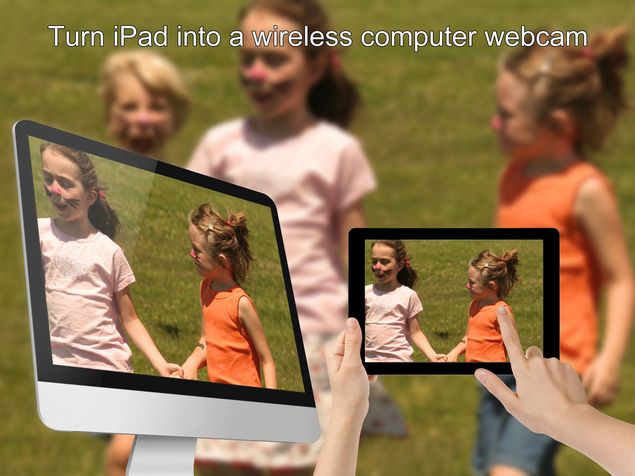
    Two of the most popular webcam apps on the App Store are EpocCam and PocketCam. We tried setting up PocketCam, but the process was too complicated and even when we did manage to set it up, we found that the free version limits you to black-and-white video and no audio. There’s a paid version that gives you access to all of PocketCam’s features.

    On the other hand, EpocCam is free (with ads) and it is very easy to set up. That’s why we would recommend using EpocCam. This is how:

    1. Make sure your phone and computer are on the same Wi-Fi network.

    2. Download the EpocCam app on your iOS device and Windows or Mac machine.

    3. When you install EpocCam it will prompt you to install some drivers. Click Install anyway in both cases. These are audio and video drivers that let the app act as a webcam.

    4. Start EpocCam on your iPhone and your computer.

    5. The app automatically searches for other devices running EpocCam on the same Wi-Fi network. Soon, the video from the iPhone will automatically show up on your computer. EpocCam lets you use only one device as a camera at a time.

    While this app generally works well, we found that at times the phone and the computer couldn’t connect to each other. Restarting the app on both devices quickly fixed the issue for us. There’s no recording feature in this app, but you can easily setup a screen recorder app such as Camstudio on your computer to record the feed from your iPhone, if you want to use the phone as a security camera and not a CCTV feed.
    epoccam_ios.jpg

    Video calls

    You can also use your phone as a webcam to make video calls from a computer. You can use your phone as a camera to chat using Skype. There are two stages to this – setting up the camera on your phone, and setting up Skype to use the phone as a camera. We’ll walk you through each stage of the process.

    First, you need to set up the camera using an app on either your Android phone or iPhone. This is how:

    Android

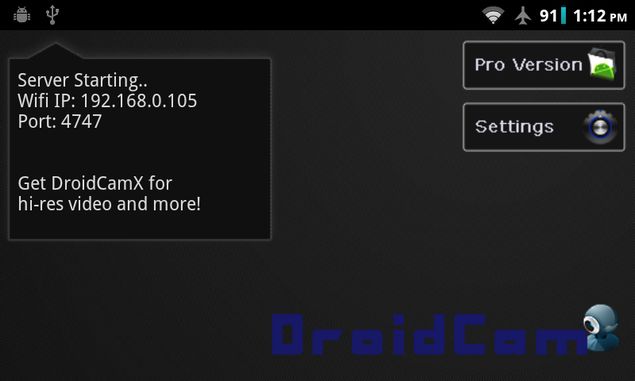
    Here’s how to set up your Android smartphone as a webcam. IP Webcam does not work with Skype, so you’ll need to install DroidCam and its PC client for this to work:

    1. Install DroidCam Wireless Webcam on your phone.

    2. Download and install the DroidCam client on your computer. Both the phone and the computer should be on the same Wi-Fi network.

    3. Open the Android app and note down the Wifi IP listed on the main screen.

    4. Open the Windows client and paste the IP on the computer.

    5. If you have a slow Internet connection, pick Low from the Video Quality drop-down menu.

    6. Click Start.

    7. Now you’ll see video from the phone on the DroidCam Windows app. This works even if your phone is locked, but the video stutters. For optimal performance, we recommend that you keep the Android app open and turn off auto-lock on the phone.

    8. Restart Skype (if it is open) and select DroidCam Source 1 as the webcam (explained after the iPhone section).

    9. Now you can use your Android phone as the webcam.
    droidcam_google_play.jpg

    iPhone

    If you’re using an iPhone then you can use EpocCam. Download it and then install and run the app on your computer and phone, as described above. Once again, both devices need to be on the same Wi-Fi network – if they are, then they will connect to each other automatically. Note that the app stops working if you hit the home button or lock your phone. EpocCam has an Android app too, but it crashed repeatedly in our tests, so we suggest you stay away from it.

    1. Install and run EpocCam on your computer and iPhone, as mentioned earlier.

    2. Open Skype and select EpocCam as the webcam (explained below).

    3. Now make a video call to any of your contacts. You’ll be using the iPhone as a webcam for the call.

    Changing the default camera on Skype

    After you’ve gotten your phone to work as a webcam (using DroidCam or EpocCam), you need to change the settings in Skype before you can use your phone as a webcam. This is what you need to do:

    1. Download and install Skype if you haven’t already. Third-party cameras don’t always work well with the Windows 8 style Skype app, so you will need the desktop version.

    2. Once Skype is running and you have signed in, you’ll need to go to Tools > Options.

    3. Click Video settings under the General tab.

    4. Select the correct camera from the drop-down menu next to Select webcam:. The name of the camera varies depending on the app you are using to connect. Android users will have to select DroidCam Source 1, while iPhone users will select EpocCam.

    6. Click Save.

    You can now use Skype on your computer to make a video call, and it will use the feed from your phone’s camera for the video.
    • 316 views
    • 1 answers
    • 0 votes
  • Asked on May 31, 2021 in Computer.

    If you are having trouble with your microphone features, the following information can help you troubleshoot and resolve issues.

    Make sure apps have access to the microphone

    Microphone settings

    If your microphone isn’t detected after updating Windows 10, you may need to give your apps permission to use it.

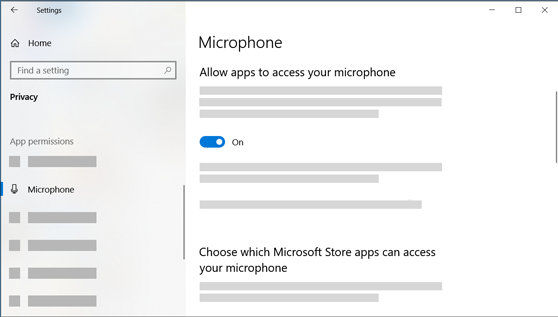
    • To let apps access the microphone, select Start  ,then select Settings  > Privacy  > Microphone  . Select Change, then turn on Allow apps to access your microphone.
    • After allowing access to the microphone, you can choose which Microsoft Store apps can access these features under Choose which Microsoft Store apps can access your microphone, and give access to non-Microsoft-Store desktop apps by ensuring that the switch beneath Allow desktop apps to access your microphone is set to On.

    Others can’t hear me

    Try the following solutions:

    • If your headset has a Mute button, make sure it isn’t active.
    • Make sure that your microphone or headset is connected correctly to your computer.
    • Make sure that your microphone or headset is the system default recording device. Here’s how to do this in Windows 10:
      1. Select Start , then select Settings  > System > Sound .
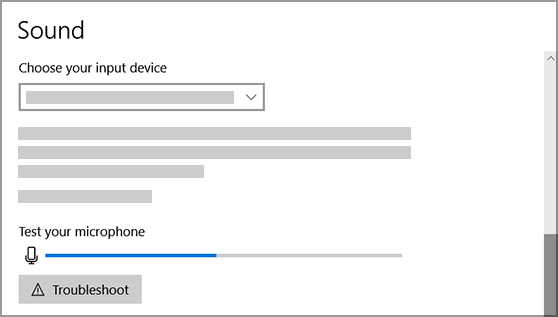
      2. In Input, ensure your microphone is selected in Choose your input device.
      3. To test your microphone, speak into it and check Test your microphone to make sure Windows is hearing you.
        Sound settings

    The microphone volume is too low or does not appear to be working at all

    Try the following solutions:

    • Make sure that the microphone or headset is connected correctly to your computer.
    • Make sure that the microphone is positioned correctly.
    • Increase the volume of your microphone. Here’s how to do this in Windows 10:
      1. Select Start  , then select Settings  > System > Sound .
      2. In Input, ensure your microphone is selected under Choose your input device, then select Device Properties.
      3. On the Levels tab of the Microphone Properties window, adjust the Microphone and Microphone Boost sliders as needed, then select OK.
      4. Speak into your microphone while checking under Test your microphone to make sure your settings work. If you see the line moving from left to right, your microphone is working. If you see no change, the microphone is not picking up sound.

    Others cannot hear me in Skype calls

    Skype settings

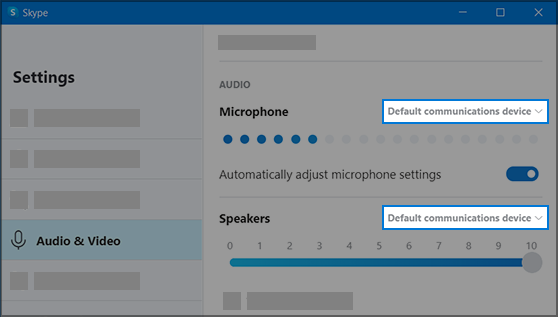
    Make sure that your microphone or headset is the Skype default recording device. Here’s how:

    1. If Skype is not open, select Start , then Skype  to open it.
    2. In the upper right corner of the Contacts List in Skype, select More , then Settings.
    3. In Audio & Video, under Microphone, make sure your microphone or headset is selected.
    4. Under Speakers, make sure your preferred speaker or headset is selected.

    • 339 views
    • 1 answers
    • 0 votes
  • Asked on May 27, 2021 in Mobile.

    Method 1: Ampere

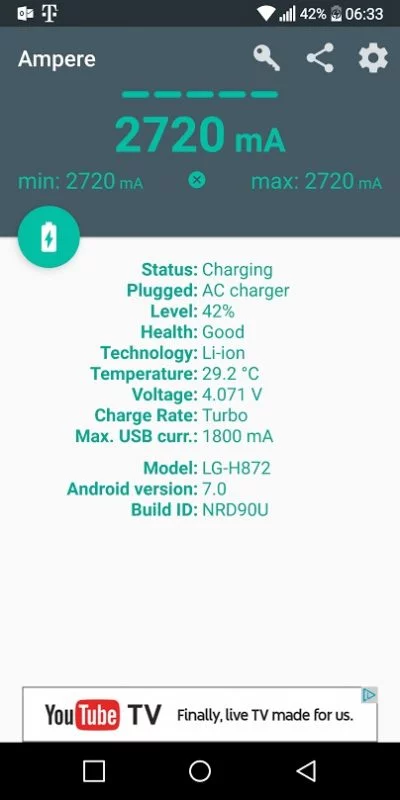
    One of the quickest and easiest ways to measure how fast your smartphone is charging or discharging is by using the Ampere app, which is available free through the Android Play Store.

    How to Test Your Android Phone's Charging Speed 2

    Once the app is installed, simply fire it up and it should immediately measure the rate of charge. In order to figure out how fast the device is being charged, simply multiply the voltage by the amperage to derive the wattage. In this case, the smartphone is drawing 4.071 Volts * (2,720 Milli-Amps / 1,000) = 11.07 Watts.

    As Quick Charge 3.0 allows both voltage and amperage to be dynamically adjusted for optimum charging, it’s not uncommon to see charging speed vary depending on a variety of factors. In ideal conditions (low battery, low CPU load, screen off, etc.) the maximum charging rate should be somewhere near 18 Watts for a device supporting Quick Charge 2.0 or Quick Charge 3.0. For devices that only support standard USB charging such as 5 volt, 1 amp or 5 volt, 2 amps, the charging speed should be somewhere near 5 watts or 10 watts respectively.

    Method 2: Power Meter

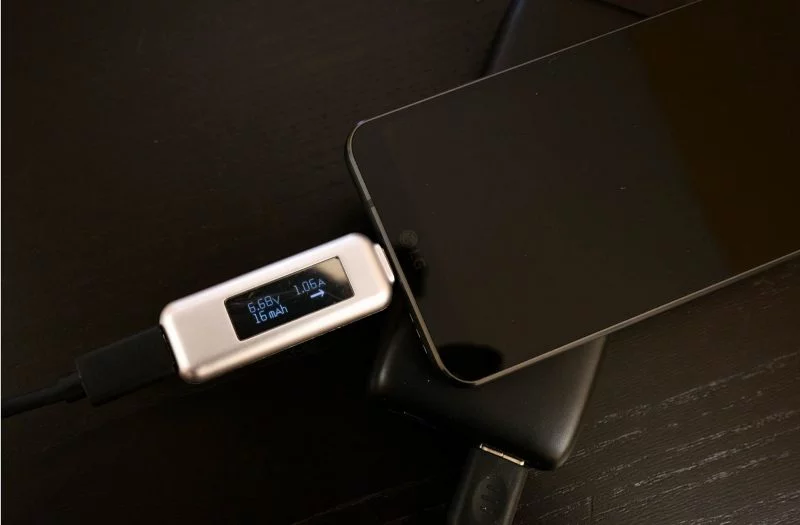
    For those who don’t like to utilize an app, or want a more real time method of measuring charging speed, a USB power meter can be a quick and easy way to accomplish this task. Since our device is USB Type-C we’re using the Satechi USB Type-C Power Meter to measure the amount of power the smartphone is drawing from the battery bank; however, USB Type-A power meters are also available online.

    To use the power meter, simply connect the power meter between the USB cable and the smartphone. Information about the charging rate should automatically be displayed.

    How to Test Your Android Phone's Charging Speed 3
    Satechi USB Type-C Power Meter

    Similar to using the Ampere app, to find the amount of wattage being charged into the smartphone, simply multiply voltage by the amperage. In this case, 6.68 Volts * 1.06 Amps = 7.08 Watts. One major benefit of using this method is that it’s much easier to check the amount of power being charged into the device with the screen off. While this makes no difference in older devices, newer devices with support for Quick Charge 3.0 and likely other newer fast charging standards will generally lower voltage and amperage when a device’s screen is on to reduce the amount of heat generated. An added bonus for some power meters is that they also offer the ability to measure the amount of power traveling through the meter which allows for some interesting testing such as figuring out the maximum battery capacity in a power bank for example.

    • 311 views
    • 1 answers
    • 0 votes
  • Asked on May 19, 2021 in Graphic Design.

    This answer was to the question: Is Adobe CC better than Adobe CS6. The original question did not specify Photoshop nor was it asking for differences.)

    I’m sure it depends on the specific program. There hasn’t been any “must-have” features for Photoshop or Illustrator since CS6. Cumulatively though, there may have been a big leap in efficiencies and performance. This may also vary by what hardware is running the software. Some features, even in CS5, needed higher end graphics cards.

    I’ve used the latest Illustrator and Indesign CC versions. Illustrator crashed quite often. Indesign is fairly stable, the only flaw that comes to mind is the shortcuts stop working sometimes (which can be awful).

    Illustrator is the Adobe product I have the most experience with. CS5 is the best version. It is more stable than CS6 (in my experience). It has multiple artboards, which were added in CS4, and these turned Illustrator into a layout monster, surpasing Indesign in many aspects. CS3 was the last time smart-guides were perfect. After that smart-guides got a little too predictive, and they often just get in the way and/or lead to small but noticeable errors.

    The real reason illustrator CS5 is the best is because it’s the latest Illustrator to support the Scriptographer plugin.

    CS5 though, that seemed like the last time Adobe cared about its users and not its stockholders. Understandable though. Their products were pirated by the time they would hit the market. The subscription model has gone a long way to stop this.

    • 319 views
    • 1 answers
    • 0 votes